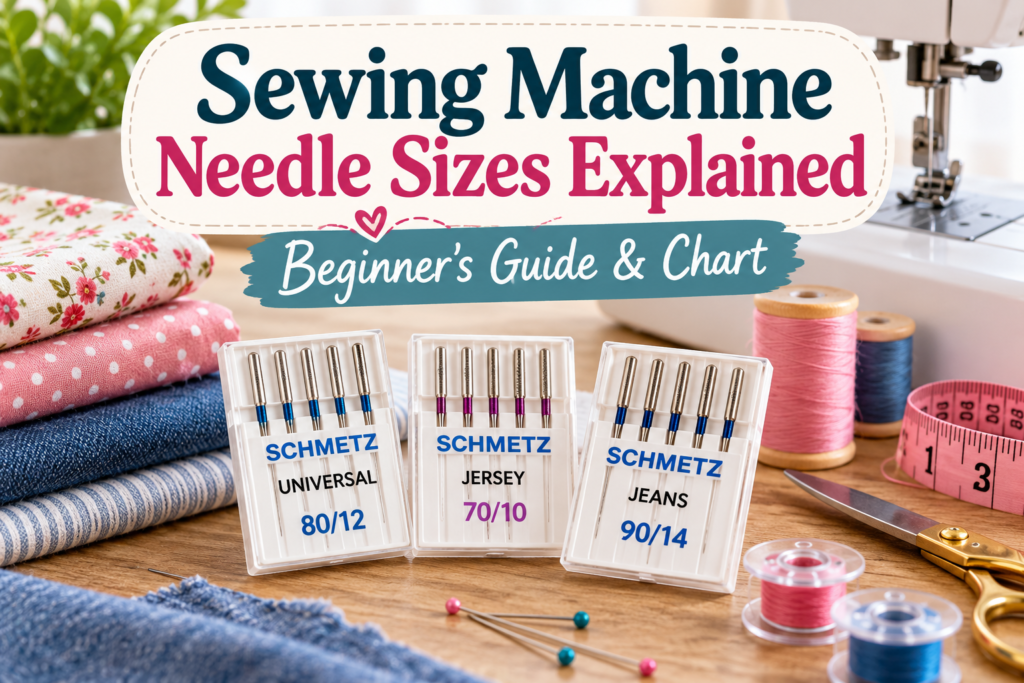

You’ve just opened a fresh pack of sewing machine needles. The little plastic case says “80/12.” Another pack in the drawer says “90/14.” A third says “Jersey 70/10.” You’re ready to sew your first tote bag, and suddenly you’re stuck on a question you didn’t know existed: which needle am I supposed to use?
Here’s the short answer. Sewing machine needle size tells you how thick the needle’s blade is. The two numbers on the package describe the same needle in two systems: the first is the European (metric) size, and the second is the American size. In both, a bigger number means a thicker needle. An 80/12 is a medium needle that suits many medium-weight cottons, while a 90/14 is a little thicker for sturdier fabric or heavier thread.
Getting the size right matters because the needle has to pass through your fabric cleanly and carry the thread without fraying it. Too fine, and it can bend, break, or skip stitches. Too thick, and it can leave visible holes.
In this guide, you’ll learn what the numbers mean, get a needle size chart and a fabric-to-needle chart, see how needle type differs from needle size, and pick up habits that prevent common needle mistakes.
What Do Sewing Machine Needle Numbers Mean?
Every needle package lists a size such as 70/10, 80/12, 90/14, or 100/16. Those two numbers describe one needle in two measuring systems.
The European (metric) number
The first number is the metric size, sometimes printed as “NM” (Nummer Metrisch, German for “metric number”). It’s based on the diameter of the needle’s blade — the long, slim shaft between the thick top section and the point — in hundredths of a millimeter.
- Size 70 → blade about 0.70 mm thick
- Size 80 → about 0.80 mm
- Size 90 → about 0.90 mm
- Size 100 → about 1.00 mm
The American number
The second number is the American size. It isn’t a measurement — it’s a traditional size label matched to the metric sizes. In most needle brands, the pairs are standardized: 70 with 10, 80 with 12, 90 with 14, 100 with 16.
One small exception to know about: a few brands print slightly different American numbers on some packs. For example, you may see a Singer needle labeled 80/11 or 70/9. If the two numbers ever look unfamiliar, go by the metric number — it’s the more consistent of the two.
Why are there two numbers?
Sewists around the world learned on different systems, so most packages print both. Think of a shoe labeled with both a US size and a European size — same shoe, two labels.
Bigger number = thicker blade (but not the whole story)
The rule of thumb is simple: the higher the numbers, the thicker the needle blade. A 90/14 is thicker than an 80/12, and a 100/16 is thicker than both.
A thicker blade is generally stiffer and less likely to bend in heavy fabric. But a needle’s strength also depends on how it’s built. A Jeans/Denim needle, for example, has a reinforced blade designed for dense fabric. A Microtex needle has a very slim shaft and sharp point that make it more delicate than a Universal needle of the same size. That’s why choosing a needle means choosing both a size and a type — more on that below.
Size also has to match your thread
The needle’s eye (the hole the thread passes through) gets bigger as the needle size goes up. On a standard Universal needle, the eye is roughly 40% as wide as the needle size, so a 100 needle has an eye about 0.4 mm wide. Your thread needs to move freely through it.
A quick test from needle maker SCHMETZ: thread the needle, hold the thread at about a 45° angle, and let go of the needle. If the needle slowly slides down the thread on its own, the size and thread are a good match.
Sewing Machine Needle Size Chart for Beginners
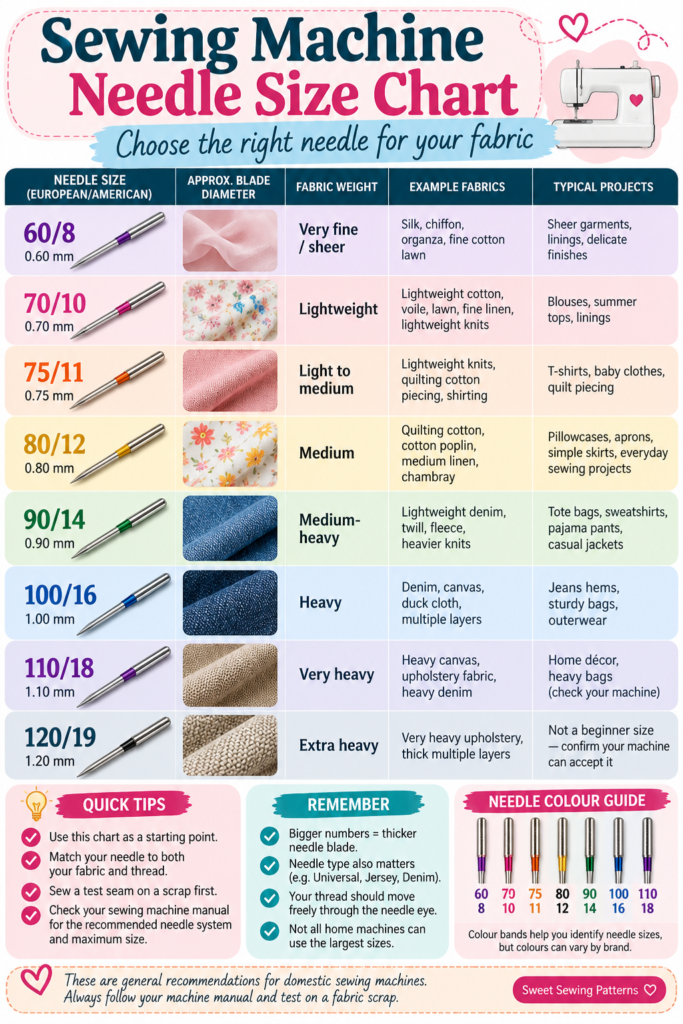
This chart is a size overview: what each common household size is generally used for. For specific fabrics — and which needle type to pair with them — use the fabric-to-needle chart in the next section.
| Needle size (European/American) | Approx. blade diameter | General fabric weight | Where it typically fits |
|---|---|---|---|
| 60/8 | 0.60 mm | Very fine / sheer | Sheers and fine silks; rarely needed for first projects |
| 70/10 | 0.70 mm | Lightweight | Light wovens; lightweight knits (with a ballpoint needle) |
| 75/11 | 0.75 mm | Light to medium | Light, stretchy knits (common Stretch size); precise piecing with fine thread |
| 80/12 | 0.80 mm | Medium | Many medium-weight wovens; the most common starting size for beginner projects |
| 90/14 | 0.90 mm | Medium-heavy | Sturdier wovens, heavier knits, slightly heavier thread |
| 100/16 | 1.00 mm | Heavy | Dense wovens and thicker seams |
| 110/18 | 1.10 mm | Very heavy | Heavy materials — check your manual first |
| 120/19 | 1.20 mm | Extra heavy | Not a beginner size; not every home machine can accept it |
General starting points vs. what your machine requires
This chart and the ones below give general starting points. Your sewing machine manual gives requirements. When they disagree, follow the manual. Your manual decides:
- Which needle system your machine uses (more on this below).
- The largest needle size it can accept. SCHMETZ notes that some home machines can’t fit 110/18 or 120/19 needles.
- Whether the machine is designed for heavy fabrics at all. A bigger needle doesn’t make a lightweight machine able to sew thick canvas or many layers.
Which Sewing Machine Needle Size Should You Use for Different Fabrics?
Fabric is where needle choice gets practical. Start with the quick reference below, then read the notes for each fabric to understand why — and when to adjust.
Fabric-to-needle quick reference
| Fabric | Starting needle type | Starting size | Adjust when… |
|---|---|---|---|
| Quilting cotton / poplin | Universal | 80/12 | Fine thread or very precise piecing → Microtex 70/10–80/12 |
| Lightweight cotton (voile, lawn) | Universal or Microtex | 70/10 | Holes look large → go finer |
| Medium-weight linen | Universal or Microtex | 80/12 | Heavier linen → 90/14 |
| Lightweight denim | Jeans/Denim | 90/14 | Thick seams → 100/16 |
| Regular to heavy denim | Jeans/Denim | 100/16 | 110/18 only if your manual allows |
| Cotton jersey (T-shirt knit) | Ballpoint/Jersey | 70/10–80/12 | Skipped stitches → try Stretch |
| Spandex/Lycra blends | Stretch | 75/11 | Heavier stretch fabric → Stretch 90/14 |
| Fleece / French terry | Ballpoint/Jersey or Stretch | 80/12–90/14 | Thick or layered → larger size |
| Chiffon / fine silk | Microtex | 60/8–70/10 | — |
| Light canvas / duck | Jeans/Denim or Universal | 90/14 | Heavier canvas → 100/16 |
| Heavy canvas / upholstery | Jeans/Denim | 100/16 | 110/18 only if your manual allows |
General starting recommendations only. Test on a scrap of the same fabric, with the same thread and number of layers, before sewing your project.
Cotton fabric
Cotton is the most common beginner fabric, and it’s forgiving. For quilting cotton and cotton poplin, a Universal 80/12 is the usual starting point. Lightweight cottons like voile and lawn sew more neatly with a 70/10. For heavier cotton twill or duck, move to 90/14 or 100/16, depending on thickness.
If you’re piecing quilt blocks with fine thread and want very straight, precise stitches, SCHMETZ suggests a Microtex (sharp) needle for high-thread-count cottons such as batiks.
Linen
Linen ranges from airy handkerchief weight to sturdy bottomweights, so there’s no single right size. Start with 80/12 for medium-weight linen, go finer (70/10) for lightweight linen, and move up to 90/14 for heavier linen. A Universal or Microtex needle works on many linens. Sew a test seam and check for puckering or uneven stitches before adjusting.
Denim
Denim is tightly woven and gets thick quickly at seams. Here, needle type matters as much as size. A Denim/Jeans needle has a reinforced blade and a modified point made for densely woven fabric.
- Starting point: Jeans 90/14 for lightweight denim. For thick denim seams, SCHMETZ recommends at least 90/14 and notes you may need to move up to 100/16.
- Machine-specific: Sizes above 100/16, or sewing over very thick seam intersections, depend on what your machine can handle. Check your manual.
Bigger isn’t automatically better. Choose the smallest Jeans needle that sews cleanly through your fabric and thread, and size up only if you get skipped stitches or the needle deflects (gets pushed sideways).
Knit and stretch fabrics
Knits — such as T-shirt jersey, interlock, and ribbing — are made of interlocking loops of yarn rather than crisscrossed threads. A sharp point can pierce and damage those loops. That’s why for knits, choose the needle type first:
- Ballpoint/Jersey needle: A rounded point that slips between the yarn loops. A good starting choice for many cotton jerseys and interlocks, typically 70/10–80/12 for light knits and 90/14 for heavier ones.
- Stretch needle: Made for highly elastic knits with spandex or Lycra. Its medium ballpoint and special shape help prevent skipped stitches (spots where the machine fails to form a stitch). Commonly sold in 75/11 and 90/14.
If a ballpoint needle skips stitches on a very stretchy knit, a Stretch needle is a common fix. Knits vary a lot, so testing matters more here than with most woven fabrics.
Fleece
Fleece and French terry are knits, and they can be thick. SCHMETZ recommends Stretch or Jersey needles for French terry fleece. Start with a Jersey 80/12 or Stretch 75/11 for lighter fleece, and move to a Jersey or Stretch 90/14 (or Jersey 100/16) for heavier fleece.
If needles keep bending or breaking on fleece, check four things: the size is right for the fabric’s thickness, the needle is new, you aren’t pushing or pulling the fabric, and your machine has been serviced recently.
Delicate fabrics
Chiffon, georgette, fine silk, and organza are lightweight and snag easily. Use a fine needle — 60/8 or 70/10 — and a fresh one. A Microtex (sharp) needle is often preferred because its slim, very sharp point makes small, clean holes; SCHMETZ recommends it for silks and microfibers.
Delicate fabrics aren’t ideal for a first project, but it’s useful to know the size range for later.
Canvas and heavier fabrics
Canvas, duck cloth, outdoor fabric, and upholstery fabric are thick and stiff.
- Starting point: 90/14 for light canvas. 100/16 for medium to heavy canvas, often in a Jeans/Denim type for its reinforced blade.
- Machine-specific: 110/18 or larger, very heavy upholstery, and many stacked layers are only appropriate if your manual says your machine can handle them.
Sew slowly, turn the handwheel by hand over the thickest spots, and never force fabric through. If the machine labors, thumps, or the needle deflects, stop — the project may be more than your machine is designed for.
Sewing Machine Needle Types Explained
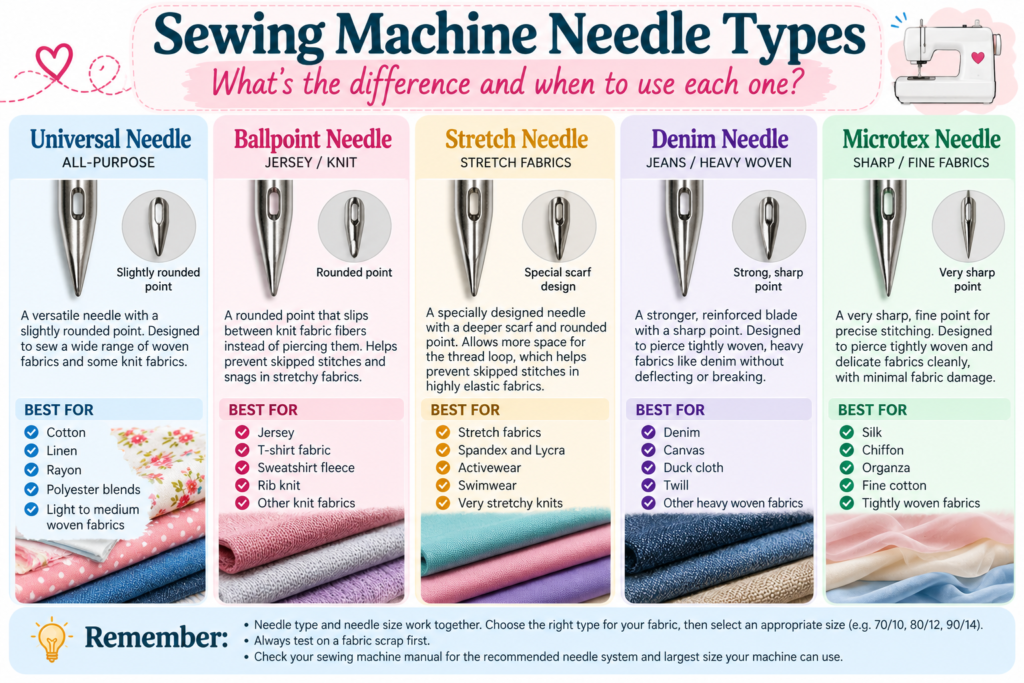
Needle size tells you how thick the needle is. Needle type describes the shape of the point and how the needle is built. You choose both. A Universal 80/12 and a Ballpoint 80/12 have the same blade thickness, but they behave very differently on knit fabric.
The type is printed on the package by name (for example, “Universal” or “Jersey”). Some brands also add a letter to the needle system code, such as -J for Jeans or -M for Microtex.
Universal needles
The general-purpose needle. Its point is sharp enough for many woven fabrics but slightly rounded, so it also works on some knits. If you sew a little of everything, this is the needle you’ll use most. SCHMETZ notes it isn’t ideal for many layers or high-thread-count fabrics.
Ballpoint/Jersey needles
These have a rounded point designed to push yarn loops aside rather than pierce them. They’re made for knit fabrics and help prevent damage to materials such as jersey and interlock.
Stretch needles
Stretch needles have a medium ballpoint and a specially shaped scarf (the scooped-out area on the back, just above the eye) to help prevent skipped stitches. They’re designed for highly elastic knits and synthetic suede.
Denim/Jeans needles
These have a reinforced blade and a modified point for densely woven materials such as denim, canvas, and imitation leather. Some quilters also use them for many layers.
Microtex/Sharp needles
A very slim needle with a very sharp point. It makes small, precise holes and straight stitches, which suits silk, microfibers, high-thread-count cottons, and topstitching. Because the point is so fine, it’s more fragile and needs replacing more often.
Needle type comparison
| Needle type | Point | Designed for | Common beginner use |
|---|---|---|---|
| Universal | Slightly rounded | Many wovens, some knits | General sewing, cotton projects |
| Ballpoint/Jersey | Rounded | Knits such as jersey and interlock | T-shirts, knit practice |
| Stretch | Medium ballpoint, special scarf | Highly elastic knits (spandex, Lycra) | Leggings, activewear |
| Denim/Jeans | Modified point, reinforced blade | Denim, canvas, dense wovens | Jeans hems, tote bags |
| Microtex/Sharp | Very slim and sharp | Silk, microfiber, high-thread-count wovens | Precise piecing, topstitching |
No single type works for every fabric in a category — two knits can behave very differently. When in doubt, test.
How to Identify Your Sewing Machine Needle Size
Once needles are out of their package, they all look alike. Here’s how to tell them apart.
1. Read the needle package. This is the easiest method. The package lists the type, the size (such as 80/12), and the needle system.
2. Look for the size stamped on the needle. Many needles have the size stamped on the shank — the thick top part that goes into the machine. The text is tiny, so a magnifier and good light help.
3. Check color coding — but know it varies by brand. SCHMETZ, for example, uses a colored band for size and, on most specialty needles, a second band for type (a Universal 80/12 has a single orange band). Other brands use different colors, and some use none, so don’t apply one brand’s chart to another.
4. Confirm the needle system in your manual. The needle system describes the needle’s shape and length so it fits your machine. SCHMETZ states that the vast majority of home sewing machines use the flat-shank system labeled 130/705 H, also sold as 15×1 or HAx1. Sergers and some specialty or older machines use different systems, so your manual has the final word.
5. Store needles so you never have to guess. Return used-but-good needles to their original case, or use a labeled needle organizer.
Tip: If you find a loose needle you can’t identify, don’t use it on an important project. Needles are inexpensive; a ruined piece of fabric isn’t.
How to Choose a Needle for Your First Sewing Project
Here’s how the decision works on four classic beginner projects.
1. A simple cotton tote bag
- Fabric: Cotton canvas or duck cloth, sometimes with a quilting cotton lining.
- Starting needle: Jeans/Denim or Universal 90/14 for light canvas; Jeans 100/16 for heavier canvas.
- Check before sewing: Where the straps attach, layers stack up. Fold a scrap to the same thickness and test. If the machine struggles, slow down and turn the handwheel by hand over the thickest spots.
2. An envelope pillowcase
- Fabric: Quilting cotton or cotton poplin.
- Starting needle: Universal 80/12.
- Check before sewing: Sew a test line on a scrap and look at both sides. Stitches should be even, with no puckering or loops. How to Sew an Envelope Pillowcase
3. A beginner apron
- Fabric: Medium-weight cotton, cotton twill, or linen.
- Starting needle: Universal 80/12 for quilting-weight cotton or medium linen; 90/14 for twill or canvas.
- Check before sewing: Test where the waistband and ties join the apron body, since that’s where layers build up. 5 Essential Garment-Making Skills You Secretly Learn by Sewing a Simple Apron
4. Practicing on knit fabric
- Fabric: A stable cotton jersey (an old T-shirt works).
- Starting needle: Ballpoint/Jersey 70/10 or 80/12. If the fabric is very stretchy or contains spandex, try a Stretch 75/11.
- Check before sewing: Stitch a test seam and gently stretch it. Look for skipped stitches and popped threads, and use a stretch stitch or narrow zigzag if your machine has one.
For every project: Start with a fresh needle, test on a scrap of the exact fabric and number of layers, and adjust before cutting into your good fabric. Your pattern’s fabric recommendations are a helpful clue, too — see How to Choose a Beginner-Friendly Sewing Pattern: 6 Things to Check First.
Common Sewing Machine Needle Mistakes Beginners Make
Needles cause many stitching problems, but not all of them. Threading errors, tension settings, and lint buildup can cause similar symptoms. Changing the needle is simply the easiest first thing to check.
Choosing the wrong needle type
- Symptoms: Small holes or damaged loops in knit fabric; skipped stitches on stretchy fabric.
- Fix: Use a Ballpoint/Jersey needle for many knits and a Stretch needle for spandex blends.
Using a needle that’s too fine or too thick
- Too fine: The needle may bend, break, or deflect in thick fabric, and thread may shred if the eye is too small for it.
- Too thick: Visible holes or puckered seams on lightweight fabric.
- Fix: Match the size to both fabric and thread, and let the machine feed the fabric — pushing or pulling it puts stress on the needle.
Continuing to use a bent, dull, or damaged needle
- Symptoms: Skipped stitches, snagged fabric, or a popping or clicking sound as the needle enters the fabric.
- Fix: Replace the needle. It’s the cheapest fix in sewing.
Installing a needle incorrectly
- Symptoms: The machine won’t form stitches, the thread keeps breaking, or stitches skip right after a needle change.
- Fix: On most modern home machines, the flat side of the shank faces the back, and the needle is pushed all the way up before you tighten the clamp screw. Some machines differ, so follow your manual.
Using an incompatible needle system
- Symptoms: The needle doesn’t fit, loosens while sewing, or stitches skip constantly.
- Fix: Check your manual for the correct system. Most home machines use 130/705 H, but sergers and some specialty or older machines need a different one.
Sewing over pins
- Symptoms: A loud clunk, a broken needle, or a needle that looks fine but suddenly sews badly.
- Fix: Remove pins just before they reach the presser foot. If you hit a pin, replace the needle even if it didn’t break.
Ignoring skipped stitches or unusual sounds
- Symptoms: Clicking, clunking, or popping noises; uneven stitches.
- Fix: Stop sewing. Change the needle, rethread the machine, and clean out lint. If needles keep breaking or problems continue with a fresh, correct needle, have the machine serviced — the timing may need adjustment.
When Should You Change Your Sewing Machine Needle?
Needles wear out. With every stitch, the point passes through fabric, and over time it dulls or picks up small damage you may not be able to see.
A common guideline: SCHMETZ suggests replacing your needle after about 8 hours of sewing and at the start of each new project. Treat that as a rule of thumb, not a timer. SCHMETZ itself notes that a needle’s life varies, so the real signal is how it sews. Dense fabrics, synthetics, many layers, and fine Microtex points can all shorten needle life.
Change your needle right away if you notice:
- Shredding or breaking thread
- Skipped or uneven stitches
- Puckering, snagging, or damaged fabric
- Larger-than-usual stitch holes
- Popping, clicking, or clunking sounds
Always replace the needle after it hits a pin or any part of the machine, even if it looks fine. SCHMETZ explains that the point is likely damaged, and continuing to sew with it can affect stitch quality and risk damage to the machine.
Beginner Sewing Machine Needle Buying Checklist
Before you buy needles, run through this list:
- [ ] Confirm machine compatibility. Check your manual for the needle system (most home machines use 130/705 H / 15×1 / HAx1) and the largest size it accepts.
- [ ] Choose the needle type for your fabric. Universal for many wovens, Ballpoint/Jersey for many knits, Stretch for spandex blends, Jeans for denim and canvas, Microtex for fine wovens.
- [ ] Choose the size for your fabric and thread. Finer fabric and thread → smaller needle; heavier fabric and thread → larger needle.
- [ ] Start with a small assortment. A mixed pack of 70/10, 80/12, and 90/14 covers most beginner projects.
- [ ] Keep spares on hand. You’ll want a fresh needle for each project, and needles break at inconvenient times.
- [ ] Label and store needles carefully. Keep them in original cases or a labeled organizer.
Helpful needle supplies for beginners
Affiliate Disclosure: Some links in this article may be affiliate links. If you make a qualifying purchase, we may earn a commission at no additional cost to you.
As an Amazon Associate I earn from qualifying purchases.
If you’re building a basic sewing kit, these product categories are worth considering. Before you buy, confirm the needle system matches your machine.
- Universal needle assortment — A mixed pack (often 70/10, 80/12, and 90/14) covers most woven beginner projects. Universal Sewing Machine Needle Assortment, 130/705 H
- Ballpoint/Jersey needle pack — For T-shirts, knit tops, and other jersey projects. Ballpoint/Jersey Sewing Machine Needles, 130/705 H
- Stretch needles — For leggings, swimwear, and spandex blends. Stretch Sewing Machine Needles, 130/705 H
- Denim/Jeans needles — For hemming jeans and sewing canvas tote bags. Denim/Jeans Sewing Machine Needles, 130/705 H
- Needle threader — Helpful if threading the tiny eye by hand is a struggle. Sewing Machine Needle Threader
- Needle organizer — Keeps partly used needles sorted by size and type. Sewing Machine Needle Organizer
Not sure what else belongs in your kit? See our Beginner’s Guide to Sewing Essentials: What You Actually Need (and What to Skip).
Frequently Asked Questions
What does 80/12 mean on a sewing machine needle?
It’s the needle’s size in two systems. 80 is the metric size (a blade about 0.80 mm thick), and 12 is the matching American size. It’s a medium needle suited to many medium-weight woven fabrics, such as quilting cotton.
Is a 90/14 needle bigger than an 80/12 needle?
Yes. A 90/14 has a blade about 0.90 mm thick, compared with about 0.80 mm for an 80/12. It suits slightly heavier fabrics or thicker thread.
What sewing machine needle size is best for beginners?
There’s no single best size, but a Universal 80/12 is the most common starting point because so many beginner projects use medium-weight cotton. A mixed pack of 70/10, 80/12, and 90/14 covers most first projects.
What needle size should I use for cotton?
Start with 80/12 for quilting cotton and poplin, 70/10 for lightweight cottons such as voile or lawn, and 90/14–100/16 for heavier cotton canvas or twill.
Can I use the same needle for every fabric?
Not reliably. A Universal needle handles many fabrics, but knits usually sew better with a Ballpoint or Stretch needle, denim and canvas with a Jeans needle, and delicate fabrics with a fine Microtex needle.
Are all sewing machine needles interchangeable?
No. Most home sewing machines use the same needle system (130/705 H, also called 15×1 or HAx1), so most household needle brands fit most home machines. Sergers, industrial machines, and some specialty or older machines need different systems. Check your manual.
How do I know when to replace my sewing machine needle?
Replace it at the start of each project, after roughly 8 hours of sewing as a general guideline, immediately after hitting a pin, or whenever you notice skipped stitches, shredding thread, snagged fabric, or popping sounds.
What happens if I use the wrong sewing machine needle size?
A needle that’s too fine may bend, break, skip stitches, or fray the thread. One that’s too thick may leave visible holes or pucker lightweight fabric. Switching to a better-matched size often solves the problem.
Final Thoughts
Needle numbers look confusing at first, but they come down to three lessons:
- Understand the numbers. The first number is metric, the second is American, and a bigger number means a thicker blade.
- Match the needle type and size to your fabric and thread. Type controls how the point meets the fabric; size controls how thick the needle is and how much thread its eye can carry.
- Check compatibility and test on scraps. Your manual has the final word, and a two-minute test seam saves a lot of frustration.
Your next step: find the needle pack that came with your machine, read the size on the case, and sew a test line on a scrap of cotton. Once you know what a clean stitch looks like, you’ll recognize when a needle needs changing on every project after it.
Free Printable Sewing Machine Needle Size Chart
Tired of guessing which sewing machine needle to use?
Download our free printable sewing machine needle size chart and keep it beside your sewing machine.
This handy one-page reference includes common needle sizes, fabric recommendations, needle types, and helpful beginner tips.
Ready for your first project? Browse our best sewing patterns for complete beginners.
Sources and Further Reading
- SCHMETZ — How to Pick the Correct Sewing Machine Needle
- SCHMETZ — FAQs: needle sizing, the 130/705 H system, color codes, and when to change needles
- SCHMETZ — Sewing Machine Needle Color Code Chart
- Sewing Parts Online — Organ Jersey Needles (130/705H) product information
- Your sewing machine’s instruction manual