
Early garment sewing success is not a matter of natural talent—it is a matter of strategic project selection. Eliminate up to 80% of beginner frustration by understanding construction mechanics, fabric stability, and low-friction pattern ergonomics.
- 80% Frustration Reduction via Strategic Pattern Selection
- 60%+ Early Dropouts Avoided by Skipping Set-In Sleeves
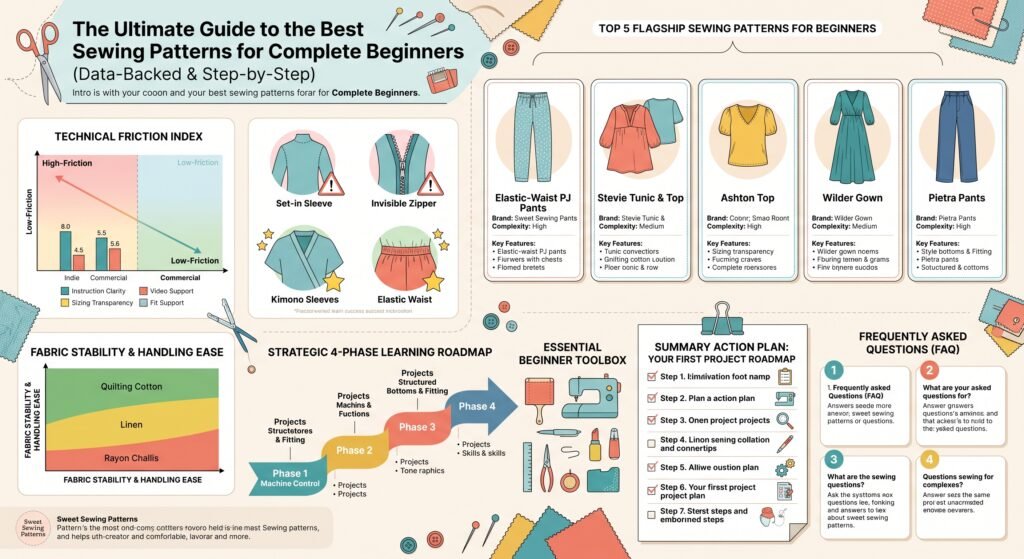
- 9.5 / 10 Indie Pattern Instruction Rating vs Commercial (5.0 / 10)
- 4 Stages Sequential Learning Roadmap to Garment Independence
1. The Anatomy of Beginner Friction: Why Projects Fail
Garment construction contains high-friction technical hurdles. When a beginner pattern combines too many complex techniques at once (such as set-in sleeves, invisible zippers, and multi-dart fitting), cognitive overload occurs. The most effective beginner patterns systematically swap high-friction techniques for forgiving alternatives.
| Construction Area | High-Friction Trap (Avoid Early) | Low-Friction Beginner Solution |
| Sleeves & Armscyes | Set-in sleeves: Requires easing a convex sleeve cap into a smaller concave armhole without puckering. | Kimono (grown-on) sleeves or diagonal raglan seams. |
| Closures & Hardware | Invisible zippers & fly fronts: Requires millimeter-precise stop points and specialty presser feet. | Elastic waistbands, drawstrings, or simple back keyholes. |
| Fitting & Contouring | Multi-dart contouring: Requires 3D spatial adjustments, FBAs, and swayback grading. | Generous positive ease (boxy cuts, tiered silhouettes). |
| Edge & Hems | Curved rolled hems: Easily stretches out on lightweight textiles. | Wide straight folded hems or enclosed facings. |
| Textile Handling | Slippery synthetics & raw silk: Distorts and slides across cutting tables. | Stable medium wovens (cotton, linen) with strong press memory. |
2. Independent (“Indie”) vs. Commercial (“Big Four”) Patterns
Where you buy your pattern is just as critical as the design itself. Commercial manufacturers (the “Big Four”: Simplicity, McCall’s, Butterick, Vogue) still use traditional tissue patterns relying on technical shorthand. Independent pattern houses act as step-by-step mini-courses with clear photos, video support, and inclusive multi-cup drafting.
- Instruction Density: Indie patterns provide 20–40 page instruction booklets filled with step-by-step photos and jargon-free explanations, compared to dense tissue-sheet shorthand.
- Built-in Educational Content: Top indie patterns teach why seams are pressed in specific directions and how to finish raw edges cleanly without an expensive serger.
- Multi-Cup Drafting: Commercial patterns default almost exclusively to B-cups. Leading indie houses offer separate B-cup and D-cup bodice pieces right out of the box.
- Digital Layering & Sew-Alongs: Print only your selected size using PDF pattern layers, accompanied by dedicated video sew-alongs. Before printing at home, make sure to review our guide on tips for printing PDF patterns to calibrate your printer scale properly.
3. The Top 5 Flagship Beginner Patterns
Based on community benchmarking, pedagogical structure, and construction ease, these five patterns represent the gold standard for novice sewists. If you want to practice your basic machine stitches before buying premium templates, explore our free sewing patterns online guide
for open-source starter templates.
1. Elastic-Waist Pajama Pants
- Category: Loungewear / Bottoms
- Brand: Various / Open Source
- Est. Construction Time: ~2.0 Hours
- Complexity Rating: 1.0 / 10
- Overview: The non-fitted starting line. Uses only 4 main pattern pieces (2 front legs, 2 back legs) with zero zippers, buttons, or facings.
- Structural Breakdown:
- 4-piece assembly (no darts)
- Folded elastic waistband casing
- Long straight seams combined with a simple crotch curve
- Key Skills: Grainline alignment, crotch seam sewing, elastic casing, edge hemming.
- Recommended Fabric: 100% Cotton Flannel or Quilting Cotton.
2. Stevie Tunic & Top
- Category: Boxy Top / Tunic / Dress
- Brand: Tilly and the Buttons
- Est. Construction Time: ~2.5 Hours
- Complexity Rating: 1.5 / 10
- Overview: Widely recognized as one of the best first garments. Features a boxy fit with zero darts, grown-on sleeves, and a simple back keyhole closure.
- Structural Breakdown:
- Grown-on (Kimono) sleeves
- Curved neckline facings
- Back keyhole with button loop
- Key Skills: Neck facing attachment, button loop crafting, folded cuff finishing.
- Recommended Fabric: Medium-weight Linen, Chambray, or Cotton Lawn.
3. Ashton Top
- Category: Sleeveless Shell / Top
- Brand: Helen’s Closet
- Est. Construction Time: ~3.5 Hours
- Complexity Rating: 3.0 / 10
- Overview: Introduces simple 3D shaping gently. Features subtle bust darts, an A-line hip silhouette, and separate B/D cup drafting.
- Structural Breakdown:
- Classic side bust darts
- Neck & armhole all-in-one facing or bias tape finishes
- Structured wide hem facing
- Key Skills: Marking & stitching darts to a point, bias binding, hem facing.
- Recommended Fabric: Light to Medium Linen, Stonewashed Cotton.
4. Wilder Gown
- Category: Tiered Dress / Blouse
- Brand: Friday Pattern Co.
- Est. Construction Time: ~5.0 Hours
- Complexity Rating: 4.0 / 10
- Overview: Delivers maximum visual impact with low construction friction. Uses raglan sleeves, a drawstring neckline, and rectangular cut skirt tiers.
- Structural Breakdown:
- Raglan sleeve construction (no set-in sleeve caps)
- Folded neck casing channel
- Rectangular gathered skirt tiers
- Key Skills: Raglan seams, gathering large fabric volume, turning fabric tubes.
- Recommended Fabric: Rayon Challis, Viscose Poplin, or Crinkle Linen.
5. Pietra Pants & Shorts
- Category: Hybrid Trousers / Bottoms
- Brand: Closet Core Patterns
- Est. Construction Time: ~6.0 Hours
- Complexity Rating: 5.5 / 10
- Overview: The ideal bridge into tailored bottoms. Features a flat-front high waist combined with a forgiving elastic back and integrated slant pockets.
- Structural Breakdown:
- Panel front with inset slant pockets
- Hybrid flat-front / elastic-back waistband
- Tailored vertical style lines
- Key Skills: Slant pocket insertion, crotch curve reinforcing, hybrid waistband assembly.
- Recommended Fabric: Medium Stonewashed Linen, Cotton Twill, or Tencel Canvas.
4. Textile Physics: Choosing Fabrics That Won’t Fight Back
Fabric choice dictates 50% of beginner sewing satisfaction. Fabrics vary widely in dimensional stability, surface friction, and press memory. Select stable wovens that stay stationary under the presser foot and hold crisp folds under a steam iron.
🟢 Green Light Fabrics (Stages 1 & 2: High Control)
- Quilting Cotton (Stability: 9.8/10): Firm structure, zero stretch, excellent pinning stability.
- Medium-Weight Linen (150–200 GSM) (Stability: 9.2/10): Highly forgiving, irons flat instantly, and hides minor stitching wobbles.
- Cotton Lawn (Stability: 8.8/10): Fine and crisp; holds shape perfectly without distorting cut edges.
🟡 Yellow Light Fabrics (Stage 3: Moderate Control)
- Chambray & Twill (Stability: 8.0/10): Stable wovens, but require size 90/14 needles to sew through bulky seam intersections.
- Cotton Double Gauze (Stability: 6.5/10): Soft and comfortable, but crinkles can stretch out unevenly if pulled while stitching.
🔴 Red Light Fabrics (Avoid Early: High Friction)
- Rayon Challis & Viscose (Stability: 4.0/10): Extremely slippery, distorts along the bias, and requires Microtex needles.
- Silk Crepe & Satin (Stability: 3.0/10): Prone to severe fraying; requires tissue paper backing during cutting.
- Single Jersey Knits (Stability: 3.5/10): Edges curl tightly and stretch out under standard sewing feet without a serger or walking foot.
5. The Strategic 4-Phase Learning Progression Roadmap
Follow this sequential roadmap to build long-term confidence without running into skill walls. Each phase introduces exactly two new technical concepts while reinforcing previously acquired techniques.
[Phase 1: Control & Straight Lines] ➔ [Phase 2: First Garments & Shaping]
                 │                                      │
                 ▼                                      ▼
[Phase 3: Volume & Drape Dynamics]  ➔ [Phase 4: Structured Bottoms & Fit]
Phase 1: Machine Control & Straight Lines
- Focus: Develop mechanical familiarity with your machine, speed regulation, and pressing discipline.
- Target Projects: Tote Bags, Elastic-Waist Pajama Pants
- Key Skills: Pressing vs. ironing, straight seams, elastic casings.
- Best Fabrics: Quilting Cotton, Cotton Flannel.
Phase 2: First Garments & Bust Shaping
- Focus: Understand 3D garment assembly, neckline facings, and basic chest contouring.
- Target Projects: Stevie Tunic, Ashton Top
- Key Skills: Seam finishes (Zigzag / French seams), marking and sewing darts.
- Best Fabrics: Medium Linen, Cotton Lawn.
Phase 3: Volume & Drape Dynamics
- Focus: Master gathering distribution, drawstring channels, and managing fluid textiles.
- Target Projects: Wilder Gown, Tiered Skirts
- Key Skills: Gathering ratio control, raglan sleeve construction.
- Best Fabrics: Rayon Challis, Viscose Poplin.
Phase 4: Structured Bottoms & Crotch Fits
- Focus: Master functional inset pockets, crotch curve reinforcing, and hybrid structured waistbands.
- Target Projects: Pietra Pants, Tailored Shorts
- Key Skills: Crotch curve reinforcement, slant pocket construction, hybrid waistbands.
- Best Fabrics: Cotton Twill, Stonewashed Denim, Heavy Linen.
6. Essential Tool Setup for Zero-Frustration Sewing
Substandard tools introduce unnecessary friction. You do not need an expensive studio setup; invest in the core gear detailed in our complete beginner’s guide to sewing essentials
before making your first cut:
- 8-Inch Fabric Shears: (e.g., Kai or Gingher). Keep them reserved exclusively for fabric—never cut paper or cardboard with fabric shears.
- Heat-Resistant Glass-Head Pins: Glass heads will not melt when pressed with a hot steam iron, unlike plastic-head pins.
- Universal Needles (Size 80/12): Replace needles after every 6–8 hours of active sewing. Dull needles cause skipped stitches and snag fabric threads.
- Quality Polyester All-Purpose Thread: (e.g., Gutermann, Mettler, or Coats & Clark). Bargain-bin thread sheds excess lint and snaps under tension.
- Tailor’s Chalk or Chaco Liner: Essential for transferring dart legs, notch markings, and button placements clearly.
- Ergonomic Seam Ripper: Unpicking stitches is a normal step in garment construction. A sharp, comfort-grip tool keeps the process quick and painless.
7. Frequently Asked Questions & Troubleshooting
Q1: Should I buy a printed paper pattern or a downloadable PDF pattern?
Both formats have clear advantages:
- Printed Patterns: Ideal if you want to skip printing and assembling pages at home. They arrive on paper with printed physical instruction booklets.
- PDF Patterns: Delivered instantly. Modern indie PDFs include layered sizing so you only print your exact size lines. You can also send the included “A0 Copyshop” file to a local print shop to skip home page taping. For setup instructions, check out our walkthrough on tips for printing PDF patterns.
Q2: Do I need an overlocker/serger, or is a standard sewing machine enough?
You do not need a serger to make durable, clean clothes. Standard home sewing machines handle raw edges effectively using:
- A standard zigzag stitch directly along the raw seam edge.
- Pinking shears (sawtooth scissors) to trim woven seam allowances.
- French seams (a simple two-step enclosed seam).
Q3: Why don’t my store-bought clothes sizes match sewing pattern sizes?
Ready-to-wear (RTW) clothing uses retail vanity sizing that varies wildly across brands. Sewing patterns use static, anatomical body measurements.
Rule: Never pick your pattern size based on your store tag size. A retail Size 8 is often a pattern Size 12 or 14. Always measure your High Bust, Full Bust, Natural Waist, and Full Hips with a soft tape measure, then select your size using the pattern’s measurement chart.
Q4: What if my bust, waist, and hips fall into three different sizes?
This is normal—very few bodies fit a single sizing column. Use size grading: draw a smooth curved line on your pattern sheet blending from your bust size at the underarm, inward to your waist size, and outward to your hip size. Loose-fitting starter patterns (like boxy tops or tiered gowns) make this easy.
Q5: Can I substitute a stretchy T-shirt knit into a pattern made for woven fabric?
Avoid swapping knits into woven patterns early on. Woven patterns are drafted with positive ease (extra room to move). Knit patterns rely on negative ease (where garment pieces are smaller than your body so the material stretches to fit). Sewing a woven pattern in jersey typically produces a baggy, distorted fit.
Q6: What is the “grainline” and why is it so critical when cutting?
The grainline runs parallel to the factory-finished edge (the selvage) of woven fabric. The grainline arrow printed on your pattern pieces must sit 100% parallel to the selvage. Cutting pieces off-grain causes finished garments to twist around the body and hang unevenly.
Q7: Do I really need to pre-wash my fabric before cutting?
Yes, non-negotiably. Natural wovens (cotton, linen, rayon) shrink 3% to 10% on their initial wash. Skipping this step means your completed garment risks shrinking out of fit after its first laundry cycle.
Q8: Why is my machine thread tangling underneath the fabric (“bird-nesting”)?
Thread nests on the underside of fabric are almost always caused by upper threading issues, not the bobbin:
- Raise your presser foot all the way up (this opens the upper tension disks).
- Unthread the top spool completely and re-thread carefully through the take-up lever.
- Ensure your bobbin is inserted so thread unwinds in the correct direction (forming a ‘P’ shape in drop-in machines).
- Hold both thread tails behind the presser foot for the first 3 stitches of every seam.
Your First Sewing Project Roadmap
- Pick a Low-Friction Pattern: Choose the Stevie Tunic or Ashton Top for forgiving ease and zero-zipper construction.
- Buy 2 Yards of Medium Linen: Solid color, 150–200 GSM linen gives maximum press memory and stays stable during cutting.
- Pre-Wash & Steam Press: Pre-shrink your fabric before pinning pattern pieces parallel to the selvage.
- Press Every Seam Flat: Press every stitch line with a steam iron before intersecting it with another seam.
Affiliate Disclosure: Some links on this page and recommended resources may be affiliate links. If you purchase pattern templates, tools, or fabrics through these links, we may receive a commission at no extra cost to you. All pattern recommendations are selected independently based on pedagogical clarity, construction ergonomics, and community benchmarking.