Introduction to PDF Pattern Printing
As sewing moves further into the digital age, more designers and brands are turning to PDF sewing patterns. These patterns offer the convenience of instant delivery, a wide variety of styles, and flexible printing options for sewists around the world. But opening a file and clicking ‘Print’ doesn’t always lead to perfect results—especially if you’re unfamiliar with printer settings or pattern file types. Misprints, inaccurate sizing, and trouble assembling pages are common frustrations.
This guide covers tips for printing PDF patterns successfully, whether you plan to use a home printer or a copy shop. You’ll learn to avoid common mistakes, understand key settings, and work confidently with formats like tiled and A0 sewing patterns.
Perfect for beginners who want a step-by-step approach and experienced crafters seeking troubleshooting help, this guide will set you up for success from download to fabric cutting.
What You Need Before You Print
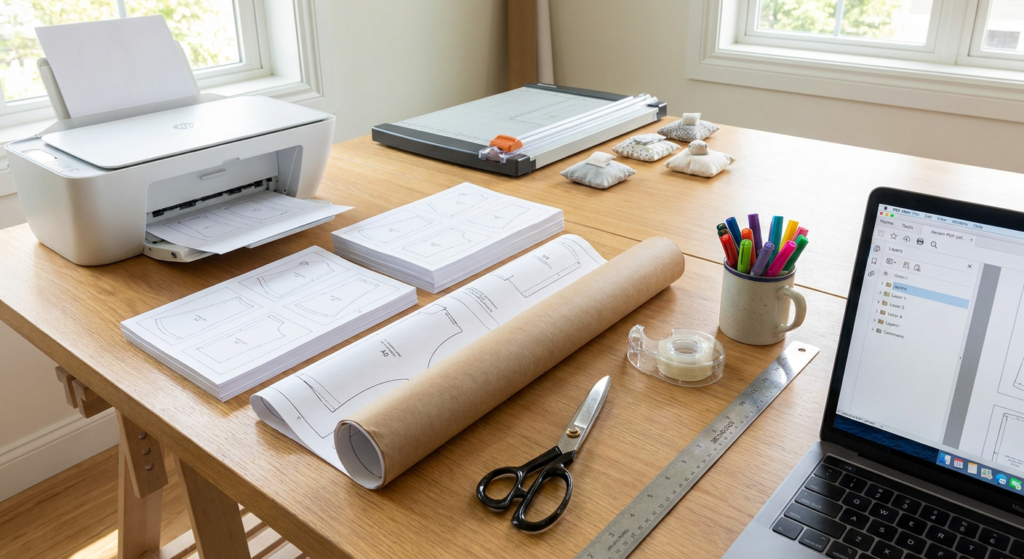
Before you click the print button, gathering a few basic supplies and tools will streamline the process—and prevent headaches later.
Basic supplies for printing PDF patterns
- Printer: Inkjet or laser, color or black-and-white, most home printers do the job—just make sure yours is in good working order.
- Paper: Standard US Letter (8.5”x11”) or A4, depending on your region and pattern instructions.
- Sharp scissors or a rotary cutter: For trimming pages, either tool will work—use what you have on hand.
- Clear tape or glue stick: To assemble the printed pages.
- Ruler: Essential for measuring the test square and checking scale.
- Access to a PDF reader: Adobe Acrobat Reader (free) is widely recommended for accurate printing of PDF sewing patterns.
Optional tools that make assembly easier
- Paper trimmer: Speeds up trimming edges neatly.
- Glue tape runner or double-sided tape: Faster, less mess than regular tape.
- Pattern weights: Keep pages from slipping when taping.
- Highlighter or sticky notes: Mark your size or cutting lines before you start.
Having the right setup saves time, prevents reprints, and helps ensure your print at home sewing patterns lay flat and line up perfectly.
Types of PDF Sewing Pattern Files
PDF sewing patterns typically come in more than one format. Understanding their differences will help you choose the right file for your project and printer.
Print-at-home tiled patterns
These are designed for standard home printers and printed on multiple pages (typically Letter or A4 size). When exported by the pattern designer, the sheet is split into tiles—like a patchwork—requiring assembly after printing.
Advantages:
- Instant printing at home
- No special equipment needed
Disadvantages:
- Must cut, overlap, or tape many pages
- Page alignment can sometimes be tricky
A0 or copy-shop patterns
A0 refers to a large format (33.1″ x 46.8″) used by professional printers or copy shops. These files are a single large sheet—no assembly required.
Advantages:
- No taping required
- Print it full-size as a single sheet
Disadvantages:
- Must pay for copy shop printing
- May not be as instantly accessible as home printing
When to use each format
- Tiled format: Choose this when you want immediate results, have a home printer, or plan to make adjustments by hand.
- A0 format: Best for complex or multi-size projects where assembly would be time-consuming, or whenever you want a crisp, no-fuss single sheet.
Some designers also include “US Copy Shop” or “A1/A2/A3/A4” options; check what your pattern download offers before printing.
Printer Settings That Affect Scale
Printing PDF sewing patterns accurately means understanding your printer software and making specific choices in your print dialog. Here’s how to ensure your project won’t end up the wrong size.
Settings to use for accurate printing
Most important:
- Select “Actual Size” or “100%”—never “Fit” or “Shrink to Printable Area.”
- Confirm paper size matches what your pattern was designed for (Letter or A4).
- If prompted about “borderless printing,” stick to standard with proper margins—borderless can skew scale.
Common printer settings to avoid
- “Fit to Page,” “Shrink Oversized Pages,” “Scaling,” or “Auto Rotate and Center”: These options can reduce your pattern by 3–8%, making clothes come out too small!
- Printing from a browser window: Browsers may not handle print scaling correctly; always use a PDF reader like Adobe Acrobat.
How paper size affects the final result
Most PDF sewing patterns are made for either Letter (US, Canada) or A4 (international), and small size differences matter. Printing an A4 pattern on Letter, or vice versa, can alter the layout. Always check the instructions:
- If your paper is smaller than the pattern’s design, edges may be clipped.
- If your paper is larger, blank borders may appear—but the central scale should stay correct if you print at 100%.
How to tell if your printer is resizing the file
- Check the print preview: Zoom in to verify the test square (usually provided on the first or second page).
- Measure the test square after printing: This is the gold standard—see the next section.
Pro tip: Some printers “remember” previous scaling choices, so double-check settings each time you print a new pattern.
How to Check the Test Square
The “test square” may be the single most important feature on any PDF sewing pattern printout.
Why the test square is important
A test square (commonly 1” x 1” or 10cm x 10cm) prints near the edge or corner of the first pattern page. Its purpose: to confirm your printer is outputting the file at the correct scale.
Printing errors of just a few millimeters can turn a perfectly-fitted garment into something too tight or loose. Dating back to when patterns were only printed, this remains just as vital for digital sewing.
How to measure it correctly
- Print only the page with the test square first.
- Use a rigid ruler (preferably not a soft tape measure).
- Place the ruler directly on the paper and check all sides of the square.
If the measurement is even slightly off, your final garment sizing will be off, too. Do not continue until you’ve solved any scaling issue.
What to do if the scale is off
- Go back to your print dialog and re-check that “Actual Size” or “100%” is selected.
- Double-check your paper size.
- Make sure you are using a PDF reader (like Adobe Acrobat).
- Avoid printing from a web browser.
Try again—if the test square still doesn’t match, consult the troubleshooting section below or your printer’s manual.
How to Use Layers in PDF Sewing Patterns
“Layers” are a digital feature in many modern PDF patterns, allowing you to choose which sizes or elements to print.
What layers are in PDF patterns
PDF sewing pattern layers typically separate each size into its own selectable group. Some may also allow toggling features, like seam allowances or construction lines.
How to turn layers on and off
In Adobe Acrobat Reader:
- Open the pattern file.
- Look for a “layers” icon in the left pane (resembles stacked squares).
- Click to view a menu of layers.
- Uncheck boxes beside sizes or options you don’t need.
- Print only what you see on screen.
This lets you print only your size, greatly reducing visual clutter and wasted ink.
Why layers help simplify printing
- Easier to trace or cut out your size.
- Less confusion, especially with multi-size files.
- Reduces printer ink and paper usage.
When layer support is unavailable
If you don’t see a layers icon or menu, your pattern may not support layers. In this case, use a highlighter to mark your size by hand before cutting.
A0 vs. Print-at-Home Tiles
Sewists often debate which is better: the big, seamless A0 printout or the humble, DIY tiled print at home sewing patterns. Here’s how they compare:
Pros of A0 files
- No assembly—pick it up from the print shop, cut, and sew.
- Perfect for very complex or large-scale patterns.
- Cleaner, more professional results.
Cons of A0 files
- Requires access to a copy shop or online print service.
- Can be expensive, especially for frequent sewists.
- May require more planning and waiting.
Pros of tiled print-at-home files
- Immediate gratification—print when you want, as many times as needed.
- No special resources necessary.
- Easy to make alterations with scissors and tape.
Cons of tiled print-at-home files
- Assembly can be time-intensive.
- Slight risk of edges not lining up perfectly.
- Cumulative misalignments can affect fit.
Which format is best for beginners
For most beginners, print-at-home tiled patterns are more accessible. They’re cost-effective, support multiple tries, and let you get started right away. A0 patterns are fantastic once you’re comfortable and want to invest in large projects or premium results.
How to Assemble Tiled Patterns
Once you’ve printed all your pages, the real magic happens: assembling the “tiles” into one seamless pattern.
Trimming or overlapping pages
- Most patterns require trimming either the top and left or right and bottom margins from each page, so overlaps are accurate.
- Some provide “overlap marks” indicating where to trim.
- Use a paper trimmer for speed, or scissors for precision.
Matching page numbers and symbols
- Each PDF page is typically numbered; align pages in numerical (or sometimes alphanumerical) order.
- Many patterns also have diamonds, circles, or alignment marks—line these up before taping.
Taping pages together neatly
- Start with small pieces of tape at key intersections to spot-check alignment.
- Once everything matches, tape entire seams for stability.
- Use clear tape for visibility; avoid tape that can yellow or peel over time.
How to keep rows aligned
- Start by assembling columns or rows, then join these larger sections together.
- Constantly check both alignment marks and page numbers.
- Use pattern weights or something heavy to keep papers from sliding as you work.
Well-assembled tiles lay as flat as possible, making pattern tracing or cutting much easier.
Recommended Paper and Assembly Tools
Your choice of paper and tools can impact both the assembly process and your pattern’s durability.
Best paper types for PDF patterns
- Standard printer paper (20-24 lb, 75-90 gsm): Most cost-effective; works for most projects.
- Premium copy paper (28-32 lb, 100-120 gsm): More durable, resists tearing with heavy use.
- Colored or recycled paper: If you want to color-code patterns for easy retrieval.
Essential tools for assembly
- Scissors or a rotary cutter
- Paper trimmer
- Clear tape or glue stick
- Ruler
Tools that are helpful but optional
- Pattern weights
- Double-sided tape or tape runner
- Highlighters and labels
- Hole punch for organizing
Investing in quality tools helps especially if you sew regularly, but the basics are enough for most projects.
Common Printing Problems and Fixes
Stuck? You’re not alone. Here are some frequent issues (and fixes) when working with PDF sewing patterns.
Pattern prints too small
- Check that “Actual Size” or “100%” is set.
- Do not use “fit” or “shrink” printing options.
- Test the square for correct scaling before printing all pages.
Pattern prints with clipped edges
- Paper size mismatch—recheck your regional paper and pattern file.
- Select a more standard margin if your printer supports it.
- Try “Poster” mode in Acrobat, which divides large pages into printable tiles.
Pages do not line up
- Double-check trim and overlap instructions.
- Check measurement accuracy with a ruler, not a soft tape.
- If persistent, consider reprinting sections—printers can slip, and even a small fraction off can multiply across tiles.
File will not open correctly
- Ensure the file isn’t corrupted. Re-download if needed.
- Open only in reliable PDF viewers like Adobe Acrobat, not in browsers.
- Make sure your software is updated to the latest version.
Pattern appears too crowded or hard to read
- Use PDF pattern layers to show only your needed size/lines.
- Print in color if your pattern is difficult to differentiate in black-and-white.
- Mark necessary lines with a highlighter.
How to Store and Organize Printed Patterns
After investing time into perfecting your pattern, keep it usable for many projects to come.
Best ways to store assembled patterns
- Flat storage: Under a bed, in a drawer, or in large artist’s portfolios.
- Rolled storage: Gently roll and secure with an elastic or band—good for very large patterns.
- Filing cabinets or magazine holders for smaller patterns.
How to label pattern pieces
- Write pattern name and size on each piece.
- Add the designer or website for future reference.
- Date your printout for version control (designers sometimes update files).
How to organize patterns by category
- Store by garment type (skirts, dresses, shirts, etc.) or by designer/brand.
- Use envelopes, clear folders, or zip-lock bags—add a preview image or pattern instructions at the front.
- If you’re pattern-obsessed, consider digital records (spreadsheets, photo inventories) for even faster retrieval.
Tips to Save Time and Ink
Smart printing means less waste for you (and the planet). Here are easy ways to save on both ink and time:
Print only the sizes you need
- Use pattern layers to uncheck sizes you don’t intend to sew.
Use layers when available
- Avoid printing unnecessary lines and create cleaner pattern pieces.
Print only selected pages when possible
- Some patterns let you print just the pieces you need (e.g., skipping facings or pockets if you won’t use them).
Use black-and-white printing when color is unnecessary
- Only print in color if you need to differentiate between sizes or markings.
FAQ About Printing PDF Patterns
Why did my pattern print too small?
Usually, the culprit is a print dialog setting like “Fit to Page.” Always select “Actual Size” and confirm with the test square before batch-printing. Printer drivers also sometimes default to scaling—always double-check.
Can I print PDF patterns from a phone or tablet?
It’s possible, especially if your device is set up for wireless printing. Be cautious: not all mobile apps honor PDF scaling or support pattern layers. Preview on a computer or test with the scale square first.
Do I need special paper for sewing patterns?
Standard Letter or A4 printer paper suffices for most. Heavier-weight paper is optional but can make the patterns more durable if you plan repeated use.
Is it better to print at home or use a copy shop?
Copy shops excel for A0 patterns and when you want perfectly seamless sheets or professional results. Home printing is best for convenience, cost, and instant access. For a great selection of free and printable designs, try my directory of 20+ Best Free Sewing Pattern Websites & Communities (anchor text for link).
How do I keep printed pattern pages organized?
Store pieces flat or rolled, label everything, and group by garment type or designer. Use folders, envelopes, or bins, and keep a log or inventory for easy reference.
Conclusion
Final reminders before printing
Accurate printing of PDF sewing patterns isn’t just about hitting the print button—it’s about careful setup and attention to detail. Double-check your printer settings, paper size, and the test square before moving on to the full project.
Encourage readers to test-print first
A few extra minutes to print and measure the test square will save you time, fabric, and frustration later.
Next steps for sewing with confidence
With these tips for printing PDF patterns, you’ll spend less time troubleshooting and more time enjoying your sewing projects. Grab your favorite pattern, do a test print, and get ready to create something beautiful!