
The Sewing Project You Were So Excited to Start
It usually begins with a pattern. Maybe it was a breezy summer top, a cute zip pouch, or a dress you could already picture yourself wearing.
You bought the fabric. You picked out matching thread. You cleared a space on the table, cut out your first pieces, and sewed the first seam. It felt good. You were actually doing it.
Then something happened. The instructions mentioned a “facing” you’d never heard of. A seam came out crooked. The machine started bunching thread underneath the fabric. You told yourself you’d come back to it this weekend.
That was three weekends ago. The pieces are still in a bag in the closet.
If you’ve ever wondered why beginners don’t finish sewing projects, the answer usually isn’t a lack of motivation. Often, it’s an unfamiliar technique, confusing instructions, sewing machine trouble, or simply choosing a project that’s too difficult for your current skills.
If that sounds familiar, you’re in very good company. Ask yourself:
- Have you ever started a sewing project and never finished it?
- Do you have cut fabric pieces sitting somewhere because you don’t know what to do next?
- Have you ever abandoned a project the moment the instructions stopped making sense?
Here’s the good news: an unfinished project is rarely a sign that you “aren’t cut out for sewing.” In this guide, you’ll learn:
- Why beginner sewing projects so often stay unfinished.
- How to pinpoint the specific reason you stopped.
- What to do when a sewing pattern suddenly becomes confusing.
- How to decide whether to rescue a project or let it go.
- How to choose a project you’re far more likely to finish next time.
Before you try to motivate yourself to sew again, it helps to understand what actually made you stop.
Why Do Beginners Leave Sewing Projects Unfinished?
Even a project labeled “easy” asks you to juggle several skills at the same time. To finish a simple garment or bag, you need to be able to:
- Understand the pattern instructions.
- Read pattern symbols and markings.
- Choose a suitable fabric.
- Cut accurately.
- Operate your sewing machine.
- Keep a consistent seam allowance.
- Join fabric pieces in the right order.
- Correct mistakes when they happen.
- Finish seams and edges so they don’t fray.
When any one of those skills is shaky, the whole project can stall. But not every stall is the same kind of problem. Most fall into one of three situations:
| Situation | What’s happening | What you need |
|---|---|---|
| Skill gap | The pattern requires a technique you haven’t learned yet | A simple explanation or demonstration |
| Technical obstacle | Something isn’t working the way it should | Troubleshooting and a small test |
| Momentum problem | You know what to do, but you can’t get yourself restarted | One manageable next action |
These need very different fixes. A pep talk won’t teach you how to install a zipper. A zipper tutorial won’t help if the real problem is that you’ve forgotten where you left off.
Your takeaway: Before deciding you just need more motivation, figure out whether you’re missing a skill, facing a technical problem, or simply having trouble getting started again. The seven reasons below will help you find out.
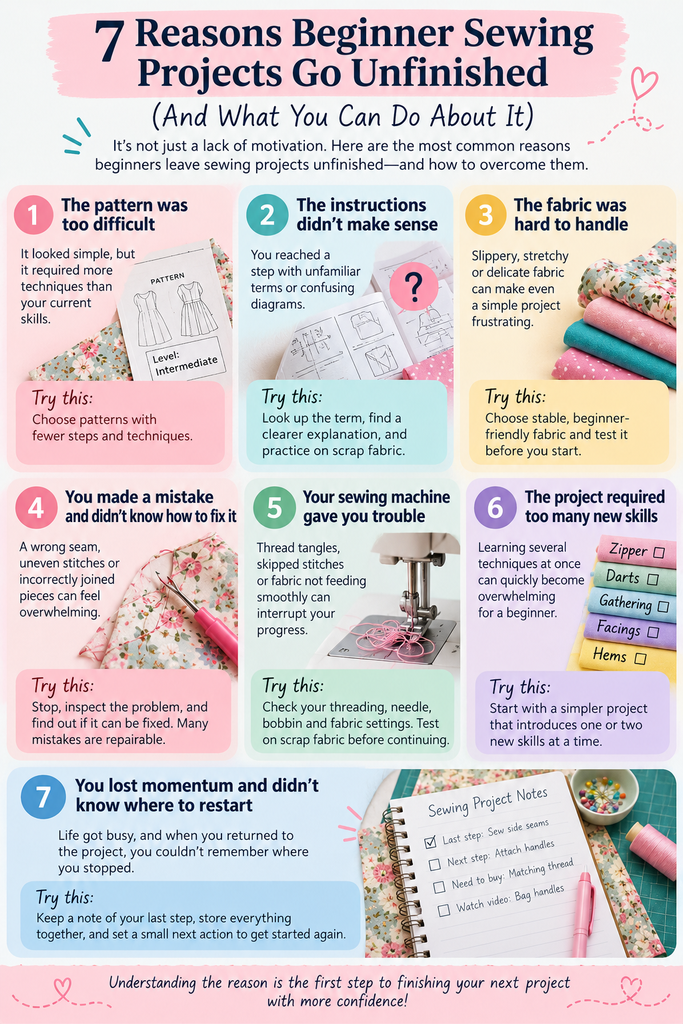
1. Your Sewing Pattern Was More Difficult Than You Expected
Many beginners pick a pattern because it looks lovely or because the envelope says “easy.” Then, halfway through, the pattern asks for techniques they’ve never tried.
This happens for a few reasons:
- Difficulty labels aren’t standardized. One company’s “easy” can be another company’s “intermediate.”
- Some patterns assume basic knowledge. They may say “finish the seams” without explaining how.
- Photos hide the construction. A finished dress looks simple. The steps behind it may not be.
- You can’t spot what you don’t know yet. An unfamiliar technique often isn’t obvious until you reach it.
A realistic example: You choose a simple-looking sleeveless dress. Reading the instructions more closely, you find it requires:
- Darts – small folded, stitched wedges that shape fabric around the body. They need accurate marking and tapered stitching.
- Gathering – pulling fabric along rows of loose stitches to create soft fullness. Getting it even takes practice.
- A zipper – one of the most common stumbling blocks for new sewists.
- A neckline facing – a separate piece sewn to the neckline and turned to the inside to give a clean finish. It involves sewing and clipping curves.
- A curved hem – harder to fold and press neatly than a straight one.
- Fit adjustments – you may need to alter the pattern before you even cut.
That’s six new skills in one project. No wonder it stalled.
How to Tell Whether a Sewing Pattern Matches Your Skills
Before you start (or restart) a pattern, ask yourself these five questions:
- Can I understand the materials list and the cutting instructions?
- Do I recognize most of the techniques in the steps?
- Does the pattern explain unfamiliar steps clearly, ideally with diagrams?
- Is the recommended fabric something I can handle at my experience level?
- Do I know where to find help if I get stuck?
If you answer “no” to two or more, the pattern may be a stretch right now. That doesn’t mean you can never make it. It means it might be your third project instead of your first.
The fix: Choose patterns made up of mostly familiar techniques, plus one or two new skills you’re ready to learn.
Try this now: Pull out the instruction sheet for one unfinished pattern and circle every technique or term you don’t understand. That list shows you exactly what’s standing in your way.
Related reading: If you’re unsure whether a pattern matches your experience, read our guide on how to choose a beginner-friendly sewing pattern to learn six things to check before starting your next project.
2. You Reached a Sewing Instruction You Didn’t Understand
Sometimes everything goes smoothly until one sentence stops you cold. Here’s a typical example:
“With right sides together, match notches and stitch using a ⅝-inch seam allowance.”
To an experienced sewist, that’s routine. To a beginner, it’s four new ideas packed into one line. Here’s what it means in plain English:
- Right sides together: Place the fabric so the “good” sides (the sides that will show on the outside of the finished item) face each other.
- Match notches: Line up the small triangle-shaped marks on the edges of each piece. Notches show which edges belong together.
- Stitch: Sew along the seam line.
- ⅝-inch seam allowance: Sew so your stitching line sits ⅝ inch in from the raw (cut) edge of the fabric, unless your pattern says otherwise.
None of these ideas is hard on its own. Trying to decode them all at once, mid-project, is what makes beginners freeze.
What to Do When a Sewing Instruction Confuses You
Use this four-step method every time:
- Stop before you sew or cut anything.
- Identify the exact word or phrase you don’t understand.
- Look up a beginner-friendly explanation or video demonstration of that one term.
- Practice on scrap fabric when it makes sense, then return to your project.
Two habits make this even easier. First, rewrite tricky instructions in your own words, right on the instruction sheet. Second, lightly check off each step in pencil as you finish it, so you always know where you are.
Try this now: Write down the exact sentence where your progress stopped. You’ve just turned “I’m stuck” into a specific question you can answer.
Free download: Tired of decoding pattern jargon? Get the Beginner Sewing Pattern Decoder: 25 Symbols & Terms Explained, a printable cheat sheet to keep beside your machine. [Get your free copy]
3. You Chose Fabric That’s Difficult for a Beginner to Handle
Sometimes the pattern is perfectly manageable, but the fabric is making everything harder. Different fabrics behave in very different ways:
| Fabric characteristic | What can go wrong |
|---|---|
| Slippery (satin, some polyesters) | Layers shift while you cut or sew |
| Stretchy (knits, jersey) | Fabric stretches out of shape or ripples along seams |
| Very lightweight (chiffon, voile) | Fabric shifts, wrinkles, or gets pulled down into the machine |
| Thick or bulky (heavy denim, fleece) | Multiple layers are hard to feed through the machine |
| Prone to fraying (loose weaves, linen) | Cut edges unravel while you work |
That doesn’t mean every fabric in these categories is off-limits. Plenty of beginners sew successfully with knits or linen. It simply means these fabrics add one more challenge on top of everything else you’re learning.
How to Choose Easier Fabric for Your Next Project
- Start with the pattern’s recommendations. Most patterns list suitable fabrics on the envelope or in the instructions. Stick to them.
- Choose a stable woven fabric when it suits the project. Woven fabrics with little or no stretch, like medium-weight cotton, stay put while you cut and sew.
- Understand where quilting cotton shines. It’s easy to handle and great for pillow covers, bags, and accessories. But it can feel stiff in garments designed for drapier fabrics.
- Test before you commit. A five-minute test can save hours of frustration.
How to do a quick fabric test: Cut two small scraps, about 6 inches square. Sew them together with your planned seam allowance. Then press the seam with your iron. Notice whether the fabric shifts, puckers, stretches, frays, or scorches. If it misbehaves on a scrap, it will misbehave on your project.
Try this now: Compare the fabric you chose for your unfinished project with the fabrics recommended on the pattern. Do they match?
4. One Sewing Mistake Made You Want to Give Up
You sew a seam, turn the piece over, and realize something is wrong. In that moment, it’s easy to decide the whole project is ruined. Usually it isn’t.
Common beginner mistakes include:
- Sewing the wrong pieces together.
- Stitching with the wrong seam allowance.
- Sewing a seam with the fabric facing the wrong way.
- Misaligning fabric edges.
- Ending up with wobbly or uneven stitches.
- Cutting a piece incorrectly.
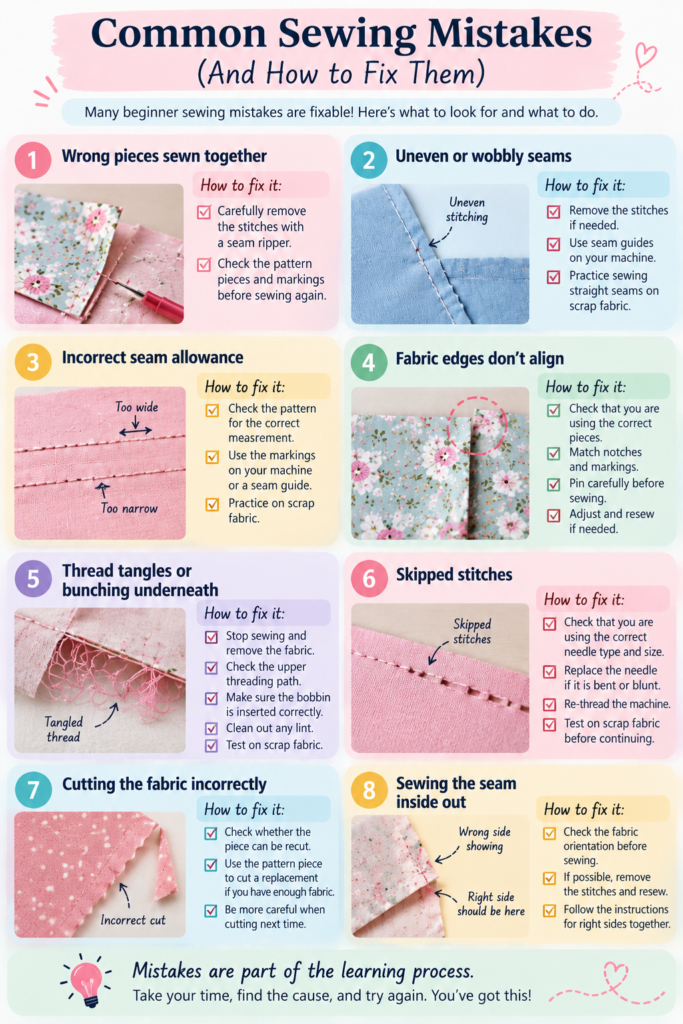
Which Sewing Mistakes Can You Fix?
Most of them, as it turns out:
| Mistake | Possible next step |
|---|---|
| Wrong pieces sewn together | Carefully remove the stitches with a seam ripper and re-sew |
| Uneven seam | Decide whether it affects the fit or look enough to re-sew |
| Fabric edges don’t line up | Recheck the pattern markings, seam allowances, and which way each piece faces |
| Tangled thread | Stop, clear the tangle, and check your threading |
| Piece cut incorrectly | Check whether you have enough fabric to recut it, or buy a little more |
To be honest about the limits: some cutting mistakes can’t be undone without extra fabric. Even then, the fix is usually a small purchase, not a whole new project. And a seam ripper is every sewist’s best friend, not a sign of failure.
The Stop–Inspect–Test Method
When something looks wrong, follow this simple routine:
- Stop. Don’t keep sewing and hope it sorts itself out. Mistakes get harder to fix the more you sew on top of them.
- Inspect. Work out exactly what went wrong before you start ripping out stitches. Compare your work to the pattern diagram.
- Test. Try your correction on scrap fabric or a small section first, whenever possible.
Try this now: Look at your unfinished project and decide: is this a mistake you can fix with a seam ripper and some patience, or does it need replacement fabric?
5. Your Sewing Machine Started Giving You Trouble
Few things kill sewing momentum faster than a machine that suddenly misbehaves. Common symptoms include:
- Thread bunching into a tangled “bird’s nest” underneath the fabric.
- Skipped stitches.
- A broken needle.
- Fabric that won’t feed through smoothly.
- Thread that keeps snapping.
- Uneven or loopy stitching.
A Simple Sewing Machine Troubleshooting Checklist
Before you assume the machine is broken, work through these basic checks:
- Stop sewing and switch off the machine before you touch anything near the needle.
- Re-thread the top thread completely, following your machine’s manual step by step. Many tangles come from a missed thread guide.
- Check the bobbin. Make sure it’s wound evenly and inserted in the right direction.
- Inspect the needle. Replace it if it’s bent, dull, or damaged, and make sure its type and size suit your fabric.
- Clean out lint and stray thread from around the bobbin area, following your manual’s guidance.
- Test on scrap fabric before going back to your project.
Different symptoms have different causes, and these checks won’t solve every problem. If your machine still misbehaves after working through them, consult the manual or a sewing machine technician.
For additional help, SINGER’s sewing machine troubleshooting guide explains common problems such as thread bunching, skipped stitches, and uneven stitching, along with practical steps you can try before returning to your project.
Try this now: Before you fix anything, write down exactly what the machine is doing. “Thread loops under the fabric on every stitch” is far easier to troubleshoot than “it’s acting weird.”
6. Your Project Requires Too Many Unfamiliar Techniques
This is a close cousin of Reason #1, but it’s worth looking at on its own. Even a modest-looking project can ask you to learn several things at once. For example, in a single project you might be learning:
- How to cut fabric accurately.
- How to keep a consistent seam allowance.
- How to sew around curves.
- How to install a zipper.
- How to finish raw edges.
Each skill is learnable. Learning all five at once, with your finished item riding on every one of them, is exhausting.
Build Your Skills One Project at a Time
A gentler approach is to let each project introduce just a little more. Here’s one possible progression:
- Simple fabric coaster: Practice measuring, cutting, sewing straight seams, and turning a project right side out.
- Envelope pillow cover: Practice hemming, straight seams, and assembling overlapping pieces.
- Basic tote bag: Practice construction, attaching handles, and finishing seams.
- Simple elastic-waist skirt: Get an introduction to garment measurements, a waistband casing, and basic fit.
This sequence is just an illustration. How hard each project feels depends on the exact pattern you choose. The principle is what matters: add one or two new skills at a time.
Try this now: Name the single new sewing technique you’d most like to learn next. Then look for a small project built around it.
7. You Put the Project Aside and Never Returned
Sometimes there’s no technical problem at all. Life got busy. You packed the project away “for now,” and now it feels strangely hard to start again. The cycle usually looks like this:
Excitement → Start sewing → An interruption → Put the project away → Forget where you were → Feel overwhelmed about restarting
The longer a project sits, the bigger the restart feels, because you no longer remember what’s done and what isn’t.
The Five-Minute Sewing Restart Method
You don’t need a free afternoon to get going again. You need five minutes:
- Take out the unfinished project.
- Find the pattern instructions.
- Identify the last step you completed.
- Gather the pieces you need for the next step.
- Write down one small action you can do next time you sit down to sew.
Those five minutes aren’t for finishing the project. They’re for getting back in. Once you know exactly what comes next, sitting down to sew feels far less daunting.
Make It Easier to Return Next Time
Whenever you stop sewing, leave yourself a quick project note. Tuck it into the bag with your pieces. Include:
- The last step you completed.
- The next step to do.
- Any mistake that needs attention.
- Any missing supplies.
- Questions you need to look up.
Future you will be very grateful.
Try this now: Spend five minutes today organizing one unfinished project, and write its project note.
What’s Really Keeping You From Finishing Your Sewing Project?
Now it’s time to apply all of this to your project. Find the statement below that sounds most like you:
| What you’re experiencing | Likely obstacle | What to try next |
|---|---|---|
| “I don’t understand the next step.” | Instruction or skill gap | Translate the instruction into plain words and practice on scraps |
| “My fabric keeps moving.” | Fabric handling issue | Check the fabric against the pattern’s recommendations and do a scrap test |
| “I sewed something incorrectly.” | Construction mistake | Use Stop–Inspect–Test to see whether the seam can be corrected |
| “My machine keeps tangling thread.” | Machine or threading issue | Work through the basic troubleshooting checklist |
| “I don’t remember where I stopped.” | Lost momentum | Use the Five-Minute Restart and mark your progress |
| “Everything feels too complicated.” | Pattern difficulty or skill overload | Simplify the next step, or switch to a smaller learning project |
You might recognize more than one row. That’s normal. Start with the obstacle that’s blocking your very next step.
A Quick Self-Assessment
Grab a pen and finish these two sentences:
“I stopped working on my sewing project because ________.”
“The smallest thing I can do to move forward is ________.”
It sounds simple, but it works. A vague feeling of “ugh, that project” becomes a specific problem with a specific next action. And specific problems are solvable.
Should You Finish, Fix, or Let Go of Your Unfinished Sewing Project?
Here’s something many beginners need to hear: you are not obligated to finish every project you start. Sometimes the smartest move is to rescue a project. Sometimes it’s to move on. You have three reasonable choices.
Finish it. Choose this when the remaining steps make sense to you, you still want the finished item, and you have the materials you need. This is often the case when the only real obstacle was lost momentum.
Fix or simplify it. Choose this when a specific mistake or difficult step is blocking you, but the project can reasonably be repaired or adjusted. For example, you might swap a tricky facing for a simpler bias-tape finish, or skip a decorative detail. (Look up any substitute technique before you try it.)
Set it aside or let it go. Choose this when the project no longer excites you, requires skills you aren’t ready to learn yet, or would cost more to rescue than you want to spend. Letting go isn’t failure. Even an abandoned project taught you something, and the fabric can often become a practice piece or something smaller.
Your Finish-or-Let-Go Checklist
Ask yourself:
- Do I still want the finished item?
- Can I identify the next step?
- Is the problem reasonably fixable?
- Do I have the supplies I need?
- Would a smaller project be a better use of my time right now?
If you answered “yes” to the first four, it’s probably worth finishing. If you answered “yes” to the last one, give yourself permission to move on.
Try this now: Choose one unfinished project and make a decision about it today: finish, fix, or let go.
How to Finally Finish a Sewing Project: A Beginner’s Seven-Step Plan
If you’ve decided a project is worth finishing, this plan will walk you back into it. Tick off each step as you go.
Your project rescue checklist:
- 1. Choose just one unfinished project. Not three. One. Put the others out of sight for now.
- 2. Find the pattern instructions and all the fabric pieces. Lay everything out so you can see what you have.
- 3. Identify exactly where you stopped. Compare your pieces to the instruction steps and mark the last completed step.
- 4. Write down the problem that interrupted you. Was it a confusing instruction, a mistake, the machine, the fabric, or just life?
- 5. Find the explanation, supply, or technique you need. Look up the term, watch a demonstration, buy the missing zipper, or practice on scraps.
- 6. Complete one manageable sewing step. Just one. Sew the seam, press it, and stop if you want to.
- 7. Record the next step before you put the project away. Leave a project note so restarting is easy next time.
Then repeat steps 6 and 7 until the project is done.
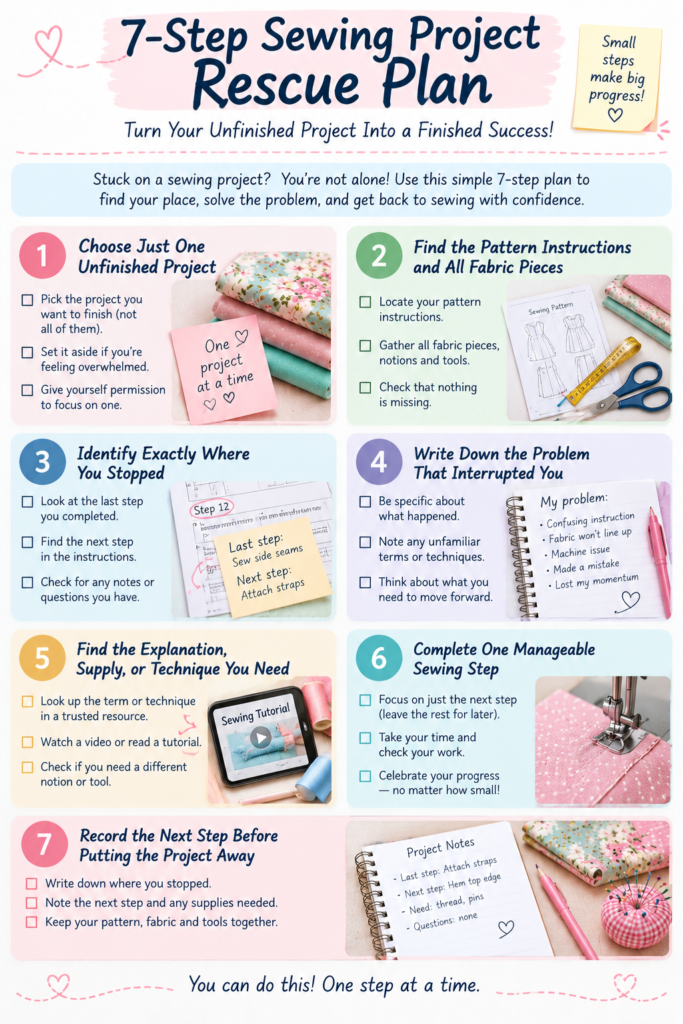
You don’t need one long, heroic sewing session to finish a project. Many beginners make better progress with short sessions of 20 or 30 minutes and a clear stopping point each time. Every completed step counts.
And be realistic with yourself. Not every abandoned project can be rescued in a single weekend, especially if you need to learn a new technique along the way. Steady progress beats a burst of effort followed by another long break.
How to Avoid Starting Another Sewing Project You Won’t Finish
Rescuing one project is great. Choosing your next one wisely is even better. A little planning up front can save you from ending up with another bag of half-sewn pieces.
The Beginner Sewing Pattern Pre-Start Checklist
Before you commit to a new project, check:
- Does the pattern clearly state its intended skill level?
- Can you review the instructions before you buy or start?
- Does it introduce a manageable number of new techniques (ideally one or two)?
- Is the recommended fabric appropriate for your current skills?
- Are the required tools and materials easy for you to get?
- Can you find explanations for any unfamiliar terms?
- Is the project size manageable for the time you actually have?
- Are you genuinely excited to make, and use, the finished item?
That last question matters more than it looks. Interest is fuel. A project you don’t really want is much easier to abandon.
Start With a Project That Offers a Quick Win
If you’re still building confidence, choose something you can realistically finish in one or two sessions. Good candidates include:
- Simple fabric coasters: small, quick, and forgiving.
- Envelope pillow covers: no zipper or buttons needed.
- Basic tote bags: useful, satisfying, and great practice for straight seams.
- Drawstring bags: a gentle introduction to casings.
These projects tend to use straight seams, stable fabric, and only a few construction steps. That means fewer places to get stuck, and a finished item you can actually use. Each quick win builds the skills and the confidence that carry you into bigger projects.
Finding Patterns That Fit Your Skill Level
One way to make pattern selection easier is to explore a collection that’s organized by project type and skill level. Resources such as Sewing Pattern Secrets group patterns by difficulty and include step-by-step written guidance and video tutorials for techniques. That can make it easier to compare options and spot what each project involves before you commit. Whatever you choose, always review the specific pattern’s instructions and required techniques before deciding what to sew.
Disclosure: This post contains an affiliate link. If you purchase through it, Sweet Sewing Patterns may earn a small commission at no extra cost to you.
Remember, though: buying another pattern isn’t the solution to every unfinished project. Often the best next step is the one already sitting in your closet.
Frequently Asked Questions
Why do I keep starting sewing projects and not finishing them?
Most beginners stop for a specific reason: a pattern that’s too advanced, an instruction they don’t understand, difficult fabric, a mistake, machine trouble, too many new skills at once, or simply losing momentum. The fastest way forward is to identify the exact point where you stopped, and why.
What should I do when I get stuck following a sewing pattern?
Stop before you cut or sew anything else. Pinpoint the exact word or instruction that’s confusing you and look up a beginner-friendly explanation or video. Practice the technique on scrap fabric, then go back to your project.
Should beginners finish every sewing project they start?
Not necessarily. Finishing projects builds confidence and skills, so it’s worth doing when you can. But if a project no longer interests you, needs skills you aren’t ready for, or would cost too much to rescue, it’s perfectly fine to postpone it, change it, or let it go.
How can I motivate myself to finish a sewing project?
Instead of waiting for a burst of motivation, decide on one small, specific next action, like “pin the side seams” or “look up how to sew a dart.” Small actions are easier to start, and starting is usually the hardest part.
What is the easiest sewing project for an absolute beginner to finish?
There’s no single “easiest” project for everyone. Look for projects with mostly straight seams, stable woven fabric, and only a few construction steps. Coasters, envelope pillow covers, tote bags, and drawstring bags are popular choices.
How many sewing projects should a beginner work on at once?
If juggling several projects feels overwhelming, focus on one main learning project at a time. Some people enjoy having a second, simpler project on the side. Do what keeps you sewing, not what makes you feel scattered.
You Don’t Have to Finish Every Project to Become a Better Sewist
Remember that bag of fabric pieces in the closet? It isn’t proof that you can’t sew. It’s a clue about what you need to learn next.
Unfinished projects happen for different reasons, and each reason has its own fix. Choosing the right pattern makes a huge difference. Unfamiliar techniques can be learned one at a time. Mistakes rarely mean starting over. And small, clear actions can get a stalled project moving again.
So here’s your next step. Take out one unfinished sewing project and ask yourself:
“What exactly stopped me, and what is the smallest next step I can take?”
Answer that honestly, take that one step, and you’ll be closer to a finished project than you were this morning. Every sewist you admire has a pile of half-finished projects somewhere. The difference is that they kept learning, one seam at a time.