
You’ve unfolded your first sewing pattern. You’ve smoothed out your fabric. You lay the paper pieces on top, ready to pin and cut.
Then you notice it: a long, straight arrow printed across one of the pattern pieces, sometimes with a point at each end.
What is this arrow for? Do I need to do something with it?
Yes, you do. That’s the grainline arrow, and it’s one of the most useful markings on a sewing pattern. It tells you which way to turn the pattern piece on your fabric before you cut.
The good news: using it is simple, and it takes about 30 seconds per piece. And if you’ve already cut something slightly crooked, don’t panic. A small wobble rarely ruins a project. Grainline is about helping your fabric behave the way the pattern designer intended, and once you understand it, you’ll use it every time you cut.
If you’ve ever wondered what does grainline mean on a sewing pattern, you’re in the right place. This beginner-friendly guide explains what the grainline arrow means, why fabric grain matters, and exactly how to line up your pattern pieces before cutting.
What Is Grainline in Sewing?
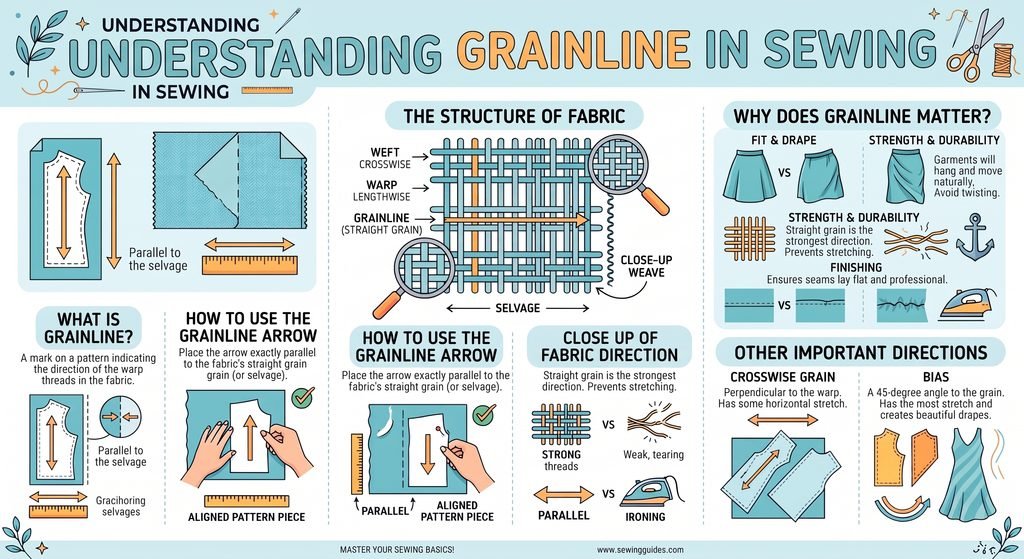
Grainline is the direction the threads run in your fabric. To understand it, it helps to know how woven fabric is made.
Woven fabric (think cotton, linen, denim, quilting cotton, shirting) is made on a loom. Two sets of threads cross over and under each other at right angles, like the lines on a piece of graph paper.
Here are the four terms you’ll need:
Warp threads (lengthwise threads)
These are the threads stretched tightly along the loom first. They run the full length of the fabric, parallel to the finished edges. In most woven fabrics, the warp is the more stable direction, with the least give.
Weft threads (crosswise threads)
These are the threads woven back and forth, over and under the warp. They run across the fabric, from one side to the other.
Selvage
The selvage (sometimes spelled “selvedge”) is the finished edge along each long side of the fabric. It’s woven or finished during manufacturing so it won’t unravel the way a cut edge does.
You can usually spot it because it:
- looks a little denser or stiffer than the rest of the fabric
- often has tiny holes, a fringe, or a strip of printed text (the maker’s name or color dots)
- runs along both long edges of the fabric as it comes off the bolt
The selvage always runs in the same direction as the warp threads.
Straight grain
Straight grain (also called lengthwise grain) is the direction of the warp threads. In other words, it runs parallel to the selvage.
A simple way to picture it
Think of your fabric as a city map with a neat grid of streets. The long avenues running north to south are the warp threads. The cross streets running east to west are the weft threads. The selvage is the edge of town that runs alongside the avenues.
When a pattern asks you to cut “on grain,” it’s asking you to line your pattern piece up with those avenues, so the piece sits square on the grid instead of at a slant.
A quick note on knits: Knit fabrics are made differently from woven fabrics, but sewing patterns still use grainline markings for them. If you’re sewing a knit, follow the grainline and cutting instructions that come with your pattern. This guide focuses mainly on woven fabrics.
What Does Grainline Mean on a Sewing Pattern?
The grainline arrow shows which direction the fabric’s grain should run through that pattern piece. For most pattern pieces, that means one thing: place the arrow parallel to the selvage.
On most commercial and indie patterns, the grainline marking is a long straight line with an arrowhead at one or both ends. It’s usually labeled “grainline,” “straight grain,” or “grain.”
The arrow is a positioning guide, not a sewing line
This is the most common beginner mix-up, so it’s worth saying clearly:
You don’t sew along the grainline arrow, and you don’t cut along it.
It’s a placement instruction. It tells you how to turn the pattern piece on the fabric before you cut. Once the piece is cut out, the arrow has done its job.
What about the arrowheads?
Some grainline markings have an arrowhead at one end, and some have one at both ends. Pattern companies don’t all use arrowheads the same way, so don’t try to read extra meaning into how many there are or which way they point.
Instead, check the pattern’s cutting layout and notes. If your fabric has a nap (a surface that looks or feels different depending on direction, like velvet or corduroy) or a one-way print (like trees that all grow upward), the pattern will usually include a “with nap” layout or tell you to place every piece facing the same direction. Follow those instructions, and the grainline arrow stays parallel to the selvage as usual.
Why the arrow isn’t the same as the edge of the pattern piece
Most pattern pieces have curved or angled edges. A sleeve, a bodice front, or a flared skirt panel may not have a single straight edge that follows the grain. The arrow gives you a reliable reference line inside the piece, so you don’t have to guess.
Why Does Grainline Matter?
Woven fabric behaves differently depending on which direction you pull it, and the pattern designer planned each piece around that. Following the grainline keeps your fabric behaving the way the design expects.
Try this: take a scrap of woven cotton and gently tug it lengthwise, then crosswise, then diagonally. In many woven fabrics, you’ll feel the least give lengthwise, a little more crosswise, and noticeably more on the diagonal. How big the difference is depends on the fiber and the weave, but that difference is exactly why grainline matters.
Here’s how grain direction affects your project:
- Drape. How the fabric falls and folds. A skirt cut on grain usually hangs straight and even from the waist.
- Stretch. Where the fabric gives. Lengthwise grain usually has the least give. It isn’t stretch-proof, but it helps garments keep their length and shape as you wear them.
- Stability. How well a piece holds its shape. Waistbands, cuffs, and bag straps are often cut on the lengthwise grain so they’re less likely to sag or grow.
- Twisting. A piece cut at a slant can pull to one side as it hangs, so side seams may slowly swing toward the front or back.
- How the garment hangs. Hems stay level and seams stay where they belong on your body.
- How pieces sew together. Two edges cut on the same grain tend to stretch a similar amount, so they feed through your machine evenly. When one edge is on grain and the other isn’t, one can stretch as you sew and the seam may ripple.
Does it really make that much difference?
It depends. A small, stiff project like a tote bag in heavy canvas is fairly forgiving. A flowing dress in rayon or a pair of trousers is much more sensitive to grain.
That’s why it’s worth building the habit on every project. You won’t always see a dramatic difference, but when you do, it’s usually too late to fix without recutting.
How to Line Up a Pattern Piece With the Grainline
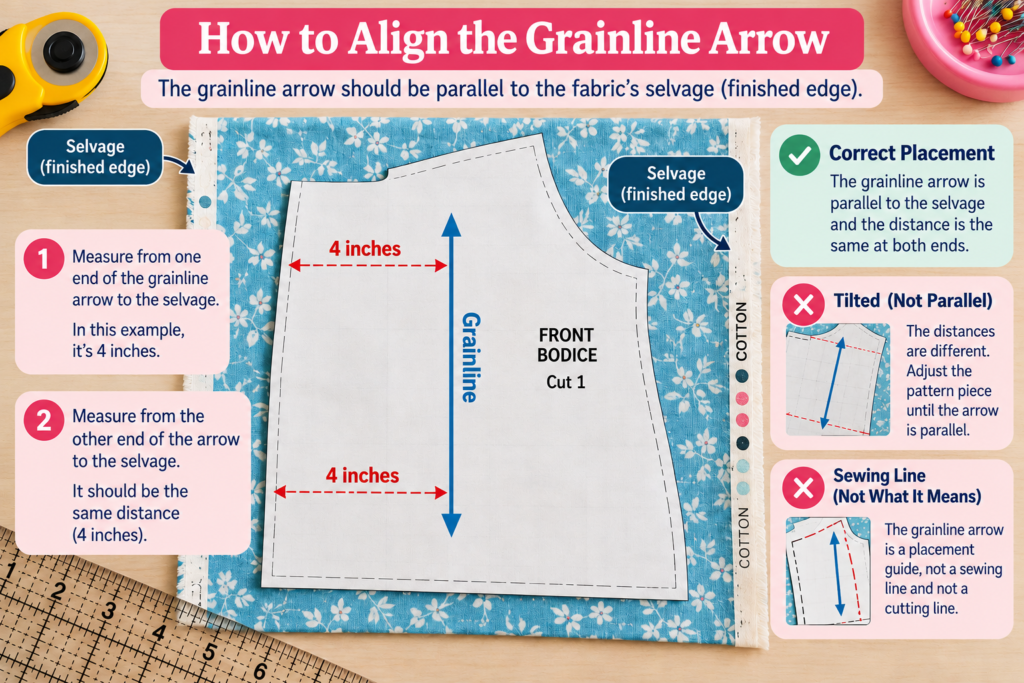
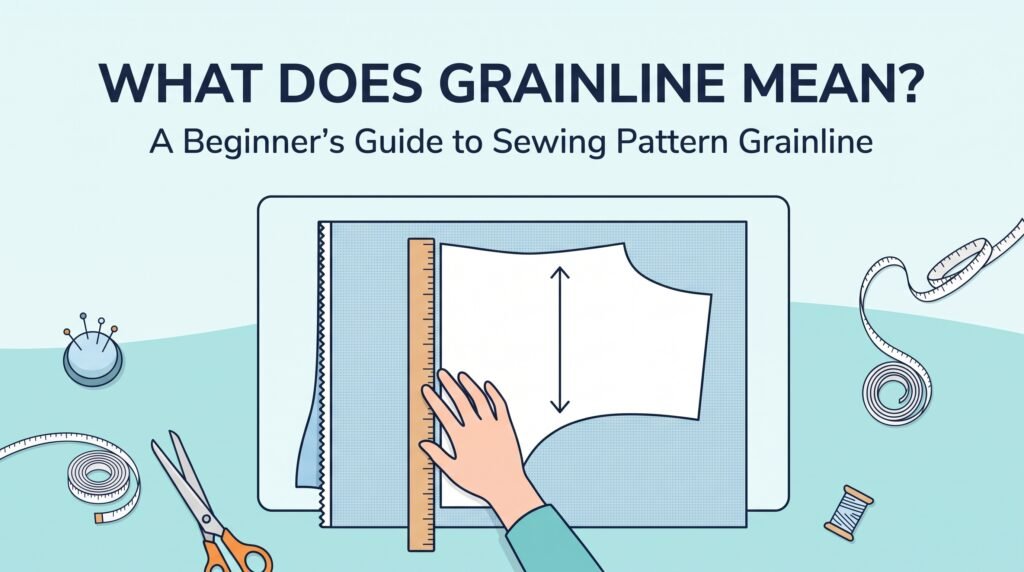
Measure from each end of the grainline arrow to the selvage, and adjust until both measurements match. That’s the whole technique. Here it is step by step.
You’ll need a ruler or tape measure. A clear quilting ruler or a small sewing gauge is handy, but any ruler works.
- Lay out your fabric as the pattern instructions say. Most patterns include a cutting layout diagram showing whether to fold the fabric and how. Smooth the fabric so it lies flat without wrinkles or tugging.
- Find the selvage. Look for the tightly finished edge running along the length of the fabric. If your fabric is folded selvage to selvage, both selvages will be lined up together along one edge.
- Find the grainline arrow on your pattern piece. It’s the long straight line with arrowhead(s), usually labeled.
- Place the pattern piece roughly where the layout diagram shows. Turn it so the arrow runs in the same direction as the selvage. Don’t worry about precision yet.
- Measure from one end of the arrow to the selvage. Measure straight across, at a right angle to the selvage. Say it’s 4 inches.
- Measure from the other end of the arrow to the same selvage. Use the same edge you measured to before.
- Adjust until the two measurements are equal. If the second end measures 4½ inches, nudge that end of the pattern piece a little closer to the selvage. Then measure both ends again.
- Pin or weight the pattern piece in place. Put a pin (or pattern weight) at each end of the arrow first, so it can’t shift while you secure the rest.
- Measure again before cutting. Pinning can nudge things slightly. One last check takes a few seconds.
Why equal measurements work
If both ends of the arrow are exactly the same distance from the selvage, the arrow is parallel to the selvage. Two lines that stay the same distance apart all the way along never tilt toward each other.
And since the selvage runs the same direction as the lengthwise grain, a parallel arrow means your pattern piece is on the straight grain.
BEGINNER GRAINLINE CHECK
Measure → Adjust → Measure Again → Secure → Cut
Tips that make it easier
- Pin the first end, then pivot. Once one end of the arrow is at the right distance, pin it. Then swing the other end until it matches. This is faster than sliding the whole piece around.
- Long arrow? Check the middle too. On a very long piece, like a trouser leg, a quick middle measurement confirms the fabric itself isn’t bunched or skewed underneath.
- Measuring from a fold works too, sometimes. If your fabric is folded lengthwise with the selvages lined up neatly, the fold is parallel to the selvage too. You can measure to it. But only if the fold is straight and the selvages underneath are aligned.
What Happens If You Cut a Sewing Pattern Off Grain?
Usually, nothing dramatic, but the finished piece may hang, stretch, or sit differently than intended. How much you notice depends on how far off grain the piece is, the fabric’s stability and drape, the size and length of the piece, and the type of project.
Here are some things a beginner might notice:
- The garment hangs strangely. A skirt might swing to one side, or a hem might dip lower in one spot.
- Seams seem to twist. Side seams on trousers or a straight skirt may slowly spiral toward the front or back of your body.
- Pieces stretch differently than expected. A neckline or armhole edge may stretch out of shape as you handle and sew it.
- The fabric drapes differently. Folds fall at an angle instead of straight down.
- Matching pieces don’t match. Two pieces cut from the same fabric, like a left and right front, behave differently because one was on grain and the other wasn’t.
- Stripes and checks look crooked. On striped or plaid fabric, being off grain is often visible right away.
How much is “too much”?
There’s no single number that applies to every project. As a rough guide:
- A tiny wobble is rarely noticeable, especially on smaller pieces and stable fabrics like quilting cotton.
- A visible tilt is more likely to cause twisting or uneven hanging, especially on long pieces, drapey fabrics like rayon, crepe, or chiffon, and garments meant to hang straight.
If you’ve already cut a piece a little off, it’s often still usable. Sew it up and see how it hangs. You’ll learn a lot from it either way.
Cutting off grain doesn’t damage the fabric or make it weaker. The fabric is exactly the same. What changes is the direction the threads run through your finished piece, and that affects how it hangs, drapes, and stretches.
Straight Grain vs. Crosswise Grain vs. Bias
Woven fabric has three main directions, and each behaves a little differently. Here’s a quick comparison, followed by more detail.
For another visual explanation of these three fabric directions, Seamwork’s guide, Do You Really Have to Cut Fabric on the Grainline?, includes examples showing how grain direction affects the way fabric hangs and stretches.
| Direction | Runs | Typical behavior | Common uses |
|---|---|---|---|
| Straight (lengthwise) grain | Parallel to the selvage | Usually the most stable, least give | Most garment pieces, waistbands, straps |
| Crosswise grain | Perpendicular (at a right angle) to the selvage | Often a little more give than lengthwise | Some yokes, cuffs, border prints, pieces too wide for a lengthwise layout |
| Bias | Diagonally; true bias is 45° to both grains | Usually the most give and the most fluid drape | Bias-cut skirts and slip dresses, bias binding, some collars |
Straight grain (lengthwise grain)
This runs parallel to the selvage, along the warp threads. In most woven fabrics, it’s the most stable direction, with the least give. That’s why most pattern pieces are cut on the straight grain: it helps garments hold their length and shape.
Crosswise grain
This runs perpendicular to the selvage, from one edge of the fabric to the other, along the weft threads. It often has a little more give than the lengthwise grain, though in many fabrics the difference is small.
Patterns sometimes place pieces on the crosswise grain on purpose, for example to use a border print along the hem, or to fit a wide piece across the fabric.
Bias
The bias runs diagonally across the fabric. True bias is exactly 45 degrees to both the lengthwise and crosswise grains.
Why does it stretch more? When you pull on the bias, you’re not pulling along any thread. Instead, the little squares of the weave shift into diamond shapes. That gives bias-cut fabric noticeable stretch, even in fabric with no spandex, plus a soft, fluid drape that clings and flows.
Bias isn’t “wrong.” Designers choose it on purpose for:
- skirts and dresses that skim the body and swing beautifully
- bias binding, which curves smoothly around necklines and armholes
- some collars, trims, and ruffles
The trade-off: bias edges stretch easily as you handle and sew them, so they need a gentle touch. That’s why bias projects are often recommended once you’ve got a few simpler projects behind you.
How to find the bias
Fold one corner of your fabric so that the crosswise edge lines up with the selvage, making a triangle. The diagonal fold is the true bias.
Does the Grainline Always Have to Be Parallel to the Selvage?
For a standard straight-grain piece, yes. But your pattern’s instructions always come first.
For most sewing pattern pieces, the straight-grain arrow should run parallel to the fabric’s selvage. However, some pieces are designed to be cut on the crosswise grain or bias. Always check the label on the pattern piece and the cutting layout before positioning it. A pattern piece may sit diagonally on the fabric while its marked straight-grain reference still runs parallel to the selvage.
A piece might be intentionally:
- Cut on the bias. On a bias-cut piece, the grainline marking is drawn at a slant across the piece. You usually still line that marking up parallel to the selvage, which puts the piece itself at an angle. Some patterns mark a separate bias line instead, so follow the pattern’s notes.
- Cut on the cross grain. The piece may say “cut on crosswise grain,” or the layout will show it turned sideways.
- Cut on the fold. These pieces have a “place on fold” marking (often a bracket with arrows pointing to one edge). That edge goes right along the folded edge of your fabric. The fold should run on grain, so fold the fabric neatly with the selvages lined up.
- Placed to suit the fabric. Stripes, plaids, border prints, one-way prints, and napped fabrics like velvet or corduroy may need special placement. The pattern will usually mention this.
The takeaway: don’t automatically rotate every piece until its arrow is parallel to the selvage. Read the markings and the cutting instructions first, then follow them.
Common Grainline Mistakes Beginners Make
Nearly every grainline mistake comes down to skipping the measurement. Here’s what to watch for, and how to fix each one.
Eyeballing the grainline instead of measuring
It’s easy to think “that looks about straight.” But a pattern piece can look straight and still be noticeably off, especially a long one.
Fix: Always measure both ends of the arrow. It takes seconds.
Measuring only one end of the arrow
One measurement tells you where the arrow is, not which way it’s pointing. The piece could still be tilted.
Fix: Measure both ends. Parallel means equal at both ends.
Confusing the fold with the selvage
When fabric is folded, the fold and the selvage are on opposite sides. If you measure to a crooked fold, your measurements won’t mean much.
Fix: Measure to the selvage whenever you can. If you use the fold, make sure the selvages underneath are lined up and the fold is smooth and straight.
Assuming the edge of a pattern piece is the grainline
The straight edge of a pattern piece isn’t necessarily on grain. Many pieces are shaped or angled.
Fix: Only line up the printed grainline arrow (or a “place on fold” edge, if that’s what the pattern says).
Rotating a piece just to save fabric
Turning a piece sideways or at an angle so it fits in a tight space is tempting, but it changes how that piece behaves.
Fix: Keep the arrow on grain. If you’re short on fabric, try rearranging the other pieces instead, or check whether the pattern offers an alternative layout.
Ignoring special cutting instructions
Notes like “cut on bias,” “cut on fold,” or “with nap” change how a piece goes on the fabric.
Fix: Read the whole pattern piece and the cutting layout before you place anything.
Cutting before checking the layout one final time
Pins shift, fabric slides, and pieces get bumped.
Fix: Do one last walk-around check before the scissors come out. Once it’s cut, it’s cut.
A 30-Second Grainline Check Before You Cut
Run through this for each pattern piece before you pick up your scissors:
- I found the grainline marking.
- I identified the selvage.
- I checked the pattern’s cutting instructions.
- I measured both ends of the grainline marking.
- Both measurements are equal for a straight-grain layout.
- My pattern piece is secured.
- I checked once more before cutting.
Grainline is only one thing worth checking before your scissors touch the fabric. If you’re still learning how to read patterns, use this sewing pattern checklist before cutting fabric to confirm your size, layout, pattern markings, and other key details first.
Understanding grainline is an important part of preparing for a sewing project. If you’re still learning how to select patterns, our guide on how to choose a beginner-friendly sewing pattern explains six things to check before you begin.
Grainline FAQ
Is grainline the same as selvage?
No. The selvage is the finished edge of the fabric. Grainline is the direction of the threads. They’re related because the lengthwise grain runs parallel to the selvage, which is why the selvage makes such a handy reference.
Does grainline always run parallel to the selvage?
The lengthwise (straight) grain always does. And for most pattern pieces, you’ll place the grainline arrow parallel to the selvage. The exceptions are pieces your pattern tells you to cut on the bias, on the cross grain, or in a special way for your fabric.
What happens if my grainline is slightly off?
Usually very little. A tiny difference on a stable fabric often isn’t noticeable. The drapier the fabric, the longer the piece, and the bigger the tilt, the more likely you’ll see twisting or uneven hanging.
Can I turn a pattern piece sideways to save fabric?
It’s best not to, unless the pattern says it’s okay. Turning a piece 90 degrees puts it on the crosswise grain, which can change its stretch and drape. Some sturdy, non-directional fabrics are forgiving here, but as a beginner, stick with the pattern’s layout.
What does “cut on the bias” mean?
It means the piece should be placed diagonally on the fabric, at about 45 degrees to the selvage. Patterns do this on purpose to give the piece more stretch and a softer, more fluid drape.
What if I can’t tell which edge is the selvage?
Look along the long edges of the fabric for one that’s more tightly woven, doesn’t fray, and may have tiny holes, a fringe, or printed text. On fabric straight off the bolt, the selvages run along both long sides, and the cut ends run across.
If your fabric has already been trimmed and you can’t find a selvage, ask for help at the fabric store, or check with a more experienced sewist before cutting. For your first projects, it’s easiest to buy fabric with the selvages still attached.
Do I need to measure every pattern piece?
Yes, every piece that has a grainline marking. Small pieces like pockets or facings take only a few seconds, and they affect how the finished project looks too. For a “place on fold” piece, the fold edge sets the grain, so check that your fold is straight and running parallel to the selvage.
The Bottom Line
For a normal straight-grain pattern piece, find the grainline marking, identify the selvage, and measure until both ends of the marking are the same distance from the selvage.
That’s it. The fabric science behind grainline can sound technical, but the action you take is simple, and it becomes second nature after a few projects.
Just remember:
Find the arrow. Find the selvage. Make them parallel.
And always check your pattern’s cutting instructions first, in case a piece is meant to go on the bias, the cross grain, or the fold.
Happy sewing!