
Selecting your first sewing machine often feels like a high-stakes engineering decision. You are met with a wall of plastic and metal, each box boasting hundreds of decorative stitches and technical jargon that promises professional results. For many, the excitement of starting a new hobby is quickly dampened by the reality of the “first-week wall”—that moment when thread jams, broken needles, and runaway fabric make you question your talent.
🧵 Free Download: Looking for a quick reference sheet? Download our Free Sewing Machine Buying Guide
In reality, most beginners who give up early are not struggling with a lack of skill; they are struggling with mechanical frustration. The machine they chose may have a high stitch count, but it lacks the ergonomic and safety features necessary to support a learner. A machine that is difficult to set up or overly sensitive to minor errors acts as a technical hurdle rather than a tool for creativity.
The secret to a successful start isn’t finding the machine with the most features. It is finding the one that actively reduces setup frustration and provides a safety net for your first stitches. To make an informed choice, you must look past the marketing and understand how the architecture of a machine dictates your success.
1. Speed Control is Your Secret Superpower
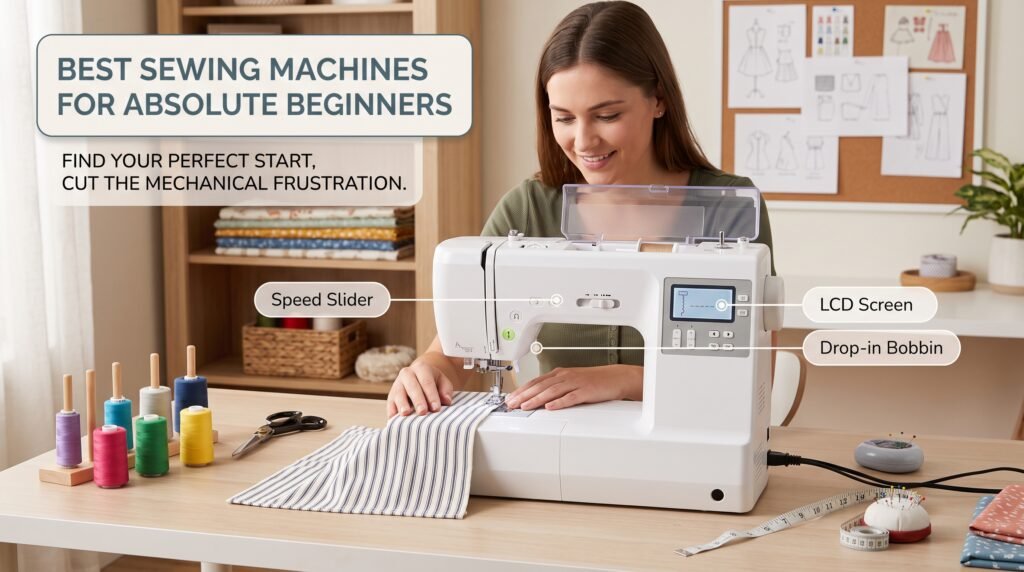
For a novice, having a dedicated speed control slider—as found on the Brother CS7000X—is far more valuable than having a massive library of 100+ stitches. While most introductory projects rely on a handful of utility stitches, every project requires precise motor control.
A speed slider acts as a mechanical safety net. Unlike basic machines where speed is controlled entirely by foot pressure, the hardware slider on the CS7000X actually “caps” the maximum speed of the foot controller. Even if a nervous beginner accidentally “floors” the pedal, the machine will only crawl at the set limit. This allows you to focus on guiding the fabric and navigating corners without the fear of runaway stitching.
“The speed limiter is especially valuable because it lets a nervous beginner cap maximum speed independently of pedal pressure.”
2. The “Heavy Duty” Label is Often Marketing, Not Magic
The term “Heavy Duty” is frequently used as a marketing hook, but it does not always mean a machine is easier or better for a beginner. Consider the Singer 4423: while it offers a high speed of 1,100 stitches per minute (SPM), its non-linear foot controller can be highly intimidating, often jumping from a stop to high speed rapidly.
In contrast, a machine like the Janome HD3000 offers a lower maximum speed (860 SPM) but is built around a rigid die-cast aluminum frame that prevents chassis flexing under load. For a beginner, torque—the ability of the needle to pierce thick layers without stalling—is far more useful than raw speed.
- Fact Check: Motor amperage determines piercing power through thick denim better than stitch speed (SPM) does. The Singer 4423 utilizes a 0.7-amp motor, which may stall on heavy seams. The Janome HD3000 uses a more robust 1.0-amp motor, providing the sustained torque needed to penetrate heavy upholstery or leather without manual hand-cranking.
3. Computerized Machines are the “Spell-Check” of Sewing
Computerized models, such as the Brother CS7000X or XR9550, use digital logic to simplify the sewing process. When you select a stitch, the machine automatically sets the appropriate length and width, removing the manual calibration guesswork that often leads to needle breakage.
Perhaps more importantly, these machines act as a guide. The LCD screen displays a specific letter code (such as “Foot J” or “Foot A”) to tell you exactly which presser foot to use for your selected stitch. This “digital abstraction” removes the need to consult the manual for every new technique, preventing the mechanical misconfigurations and foot collisions that plague beginners.
“This digital error-prevention system drastically reduces mechanical misconfigurations, needle breakage, and foot collisions.”
🧵 Free Download: Looking for a quick reference sheet? Download our Free Sewing Machine Buying Guide (PDF) — no sign-up or email required.
4. Architecture and Geometry: Bobbins and Feed Dogs
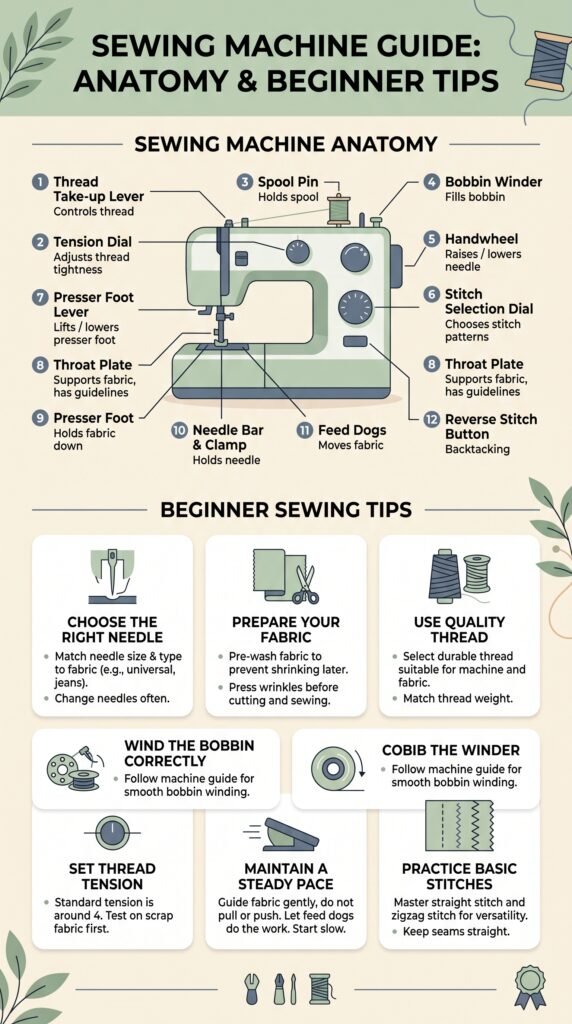
One of the most consequential design choices for a beginner is the bobbin system. Modern machines typically use either a horizontal top drop-in bobbin or a vertical front-loading system (seen on budget models like the Singer M1500). The top-loading system is superior for beginners because it allows you to monitor thread supply visually through a clear cover and is structurally less prone to severe thread jams.
Furthermore, you must look at the feed dog geometry—the metal teeth that move the fabric. While budget models use 4-piece sets, higher-tier machines like the Janome HD3000 use a 7-piece feed dog assembly. More feed dogs mean the fabric is held securely from more angles, preventing the “swimming” or uneven feeding that causes crooked seams.
Top-Loading Bobbin Benefits:
- Visibility: Monitor thread supply to avoid running out mid-seam.
- Jam-Resistance: Rotary hook design is less prone to birdnesting.
- Auto-Catching: Most “Quick-set” bobbins automatically catch the thread loop, eliminating the need to manually draw it up.
5. The “Birdnesting” Myth (It’s Not the Bobbin’s Fault)
“Birdnesting”—the massive accumulation of looped thread underneath the fabric—is the most common diagnostic failure for new sewists. While the mess appears on the bottom of the fabric, the cause is almost always located at the top of the machine.
When you thread the upper path with the presser foot in the down position, the tension discs are closed, preventing the thread from seating deeply between them. This results in zero tension on the upper thread, causing the shuttle hook to pull endless slack into a tangled mess below.
Rule of Thumb: To systematically prevent birdnesting, the operator must strictly adhere to the following setup sequence: Always raise the presser foot prior to threading the upper machine path.
🧵 Free Download: Looking for a quick reference sheet? Download our Free Sewing Machine Buying Guide (PDF) — no sign-up or email required.
6. Modern Machines are Not Your Grandmother’s Cast Iron
If you are using a modern machine like the Brother CS7000X, you must unlearn the maintenance habits of the past. Modern computerized machines are engineered with synthetic composite gears that are self-lubricating.
Applying oil to these machines can actually damage the internal components. Furthermore, the common practice of using canned air can be destructive, as it blows abrasive lint deeper into the gears and the bobbin race.
Maintenance Red Flags:
- No arbitrary oiling: Synthetic composite gears do not require routine user lubrication.
- No canned air: Use the provided brush to remove lint manually.
- The 6-8 Hour Rule: Change your needle every 6-8 hours of active sewing. A dull needle is the leading cause of skipped stitches and fabric damage.
7. The Safety Switch You Didn’t Know You Needed
For those who want high-speed performance with built-in safety, the Bernette b05 Academy offers a unique design choice: a 50% hardware speed-limiter switch.
Unlike the slider on the Brother CS7000X, which is a software limit, the Bernette’s switch allows the machine to maintain its full professional-grade torque and piercing power even when the speed is capped at 550 SPM. This is a vital distinction for beginners working on heavy materials like canvas, where you need maximum power but want a controlled, safe velocity.
Conclusion: Your First Stitch is a Diagnostic
The core philosophy of choosing a beginner machine should be prioritizing ease of setup and operational ergonomics over superficial features. Your machine should be a partner in your learning, not a source of constant troubleshooting.
As you begin, preserve your first scrap of fabric on which the machine successfully sews. This is your “diagnostic reference.” Directly on that scrap, use a marker to record three critical pieces of metadata:
- Needle size (e.g., 90/14 Universal)
- Thread type (e.g., All-purpose polyester)
- Tension setting (e.g., 4.0)
When a future project misbehaves, this reference allows you to determine if the issue is the machine’s setup or a particularly difficult fabric choice.
Keep This Guide by Your Sewing Table
Get our full machine comparison matrix, model profiles, and birdnesting diagnostic chart in a clean, printable format.
⬇ Download Free Guide (Direct PDF)Are you choosing a machine that empowers your creativity, or one that adds a technical hurdle to every project?